NTU Malware Reverse Lab 3 write up
tags: NTU_MR Malware Reverse Engineering and Analysis NTU
[TOC] | Name| 何秉學 |StuID| R11921A16| | ——– | ——– | ——– | ——– |
Review Packing and Unpacking
- How does packing and unpacking work?
作者會把原本的code section和data section,放在UPX1,並且用unpacking stub(裡面存放解殼的程式),把UPX1的內容一點一點的還原回UPX0(也就是空區段),並跳回正常程式的執行進入點(original entry point,
OEP),最後跳回去的動作叫做Tail Jump或Long Jump,另外,多長的jump才是長,可能要依照經驗值判斷,或是直接跳過去後分析程式在幹嘛
- 實際上執行脫殼的時候,除了
OEP的重建外,還需要重建Imports,這兩者都處理好後才算是脫殼完成 - 當分析脫殼執行到如下圖這樣的情況時,就離終點不遠了,也就是
jmp的地址離目前的程式很遠,且之後的程式有很多空指令或垃圾byte,**此為`UXP`殼的特徵**
- 可以用
PEiD這個工具(或是用Entropy之類的,但是不一定準確)判斷樣本有沒有加殼,或是加了甚麼殼,上圖是沒有加殼的一般程式,下圖是加了UPX的加殼程式

- 若是要處理
Import Table Reconstruction,可以用OllyDump、ImpRec或是Scylla這些工具來進行,在Practice中是用Scylla演示(且可以搭配x32dbg或x64dbg進行) - 老師有說在
Long Jump之前會搭配popinstruction,這可能可以當作解析OEP的線索 -
Tail Jump,不一定是用jmp,也可以是callinstruction;另外,跳轉的地址也不一定是一個明確的地址,也可能用暫存器存起來,這部分可以注意一下
Practice - upx_exercise.exe
Observation
- First things first, we can observe the file by executing it directly. Obviously, you should enter correct
CTFkey by analyzing.
Unpacking
Static analysis - IDA Pro
- You are not allowed to disassembly by doing nothing, because it was packed by
UPX. Therefore, our objective is to unpack it and try to analyze it original code to get theCTF Flag.
Dynamic analysis - x32dbg
- In
UPX-basedpacking, it has a feature that in order to not let the data be flushed during unpacking, it must store all data to the stack by using `pushad` instruction.
- Then, you’ll see a lot of
jmpinstruction to unpack the original code.
- Scrolling down the code, you’ll see a `popad` instruction at
0x0134AEDE, a `jmp` instruction at0x010EAEEC, and a lots ofnullinstruction which all three are satisfied all features thatUPX-basedpacking method has. It’ll restore all data that stored in stack and jump toupx_exercise.134244D.
- Set the break-point and press
runbutton inx32dbg, then pressstep intobutton to observe the code. - Now, the code has already unpacked, then we can use **`Scylla`** to do
Import Reconstruction.

- Press
IAT Autosearch(Import Address Table) button to search and then pressGet Importsbutton. Finally, you will get all imports that this file used, andScyllawill help you to rebuild it. Press
Press Dumpbutton to getIATfile.
- Press
Fix Dumpand choose the file what we dump to reconnect theIATand this file. You’ll see the log saidImport Rebuild successand you’ll get a new file namedupx_exercise_dump_SCY.exethat repaired byScylla.
Analyze
Re-static analysis - IDA Pro
- Used
IDAto reanalyze the unpacking file. - Used string searching to find the string
nopethat appear in yourcmd.
- Used cross reference to find which part has used it.


- The main part is shown as below
1
2
3
4
5
6
7
8
9
10
11
12
13
14
15
16
17
18
19
20
21
22
23
24
25
26
27
28
29
30
31
32
33
34
35
... sub_E01EB0(std::cin, &Memory); LOBYTE(v116) = 1; MEMORY[0] = 0; v96 = 0xFCC1D3C4; v97 = 0xD8D2C8DE; v98 = 0xD8D3E8E0; v99 = 0xD8C2EFB0; v100 = 0xC2ECB3C1; v101 = 0xB3EBE1D8; v102 = 0xD5F3D8BE; v103 = 0xB3EFD8DE; v104 = 0xF5C2E3D5; v105 = 0xFAD6D6D8; v64 = 1; HIBYTE(v95) = 1; v65 = 0; v93 = 0; while ( v65 < 40 ) { v66 = (char *)&Memory; if ( v111 >= 16 ) v66 = (char *)Memory; v67 = v66[v65] ^ 0x87; v68 = *((unsigned __int8 *)&v96 + v65); v94 = 0; if ( v67 != v68 ) v64 = v94; HIBYTE(v95) = v64; v93 = ++v65; } v69 = "Congratz?!"; if ( !v64 ) v69 = "Nope!"; ... - From
v96tov105, it stored 40 bytes and it seems do something in while loop 40 times. In addition,v67 = v66[v65] ^ 0x87;this line usedxorinstruction that seems a encrypt part. And then it compared&v96 + v65andv67that encrypt the string what you input. - If all the strings you input after process
xorto0x87are strictly the same withv96tov105, then it’ll printCongratz?!, otherwise, printNope. - Used online_xor to get
v96tov105encrypted strings. And then used online_hex2ascii to get the
 CTF Flag.
- The answer is `**CTF{YOU_goT_7hE_F4kE_fl49_tRY_h4RdEr_QQ}**`, though it is not a real answer.
- Note that, the demo from TA is finished, therefore, I still don’t know the real flag is.
Homework - upx_Revil.exe
Static Analysis Observation
- Use
IDAto analyze this sample and obviously packed sample
- Use the skill above then you can answer the question easily.
Homework - custom_packer_Revil.exe
Static Analysis Observation - DetectItEasy
- Though I used the tool,
DetectItEasyto check if this sample was packed or not, the answer is not quite explicit.
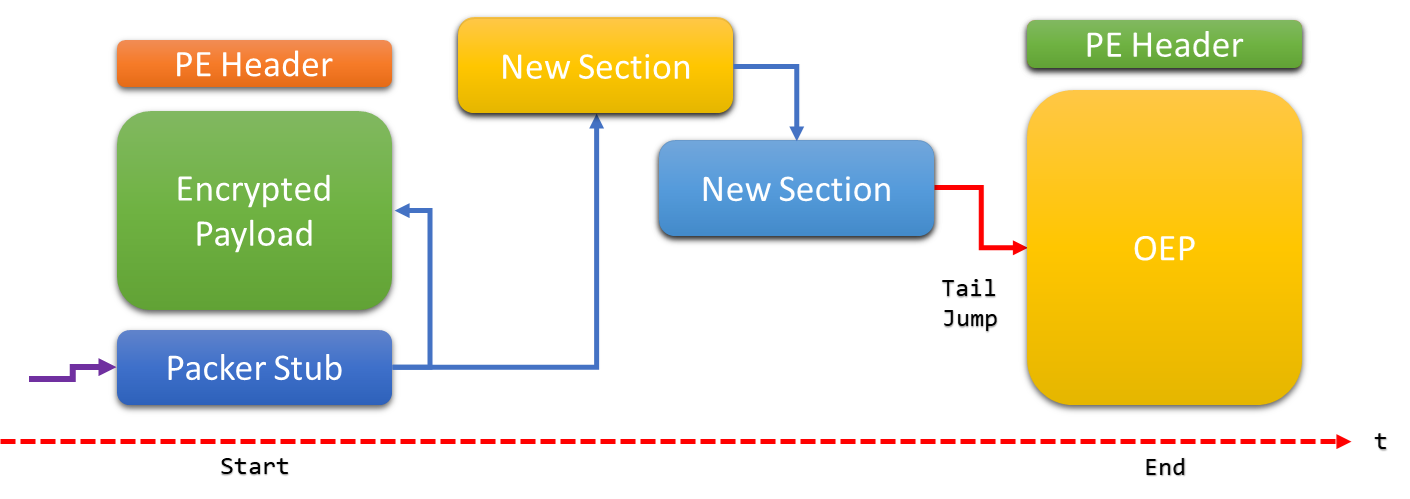
- Through the write up made by Security Joe, it’s not a simple
UPXsample.This packer can be classified as a hybrid packer because during its execution it injects several pieces of
shellcodeto finally replace the complete memory image of the PE. A diagram that explains this kind of packer is shown below.This kind of packer will do a self injection in its own memory space.Basically, it'll allocate or creating a new memory section in the same process and it can write shellcode or complete PE files to execute. - Basically, it’s going to read the encrypted content, and gonna save or gonna copy that to the new section(the yellow block)
Analyze & Find OEP
- Finding first injected
shellcode(LocalAlloc)- Set the break point at
0x00404DB6and step into this line
- And you’ll find the module that you are analyzing is
kernel32.dll.
- This is not what we care, so we press the button(
Execute till return) to skip this module. And then step into this operation to go back to the custom packer REvil from windows library.
 - Follow the memory address in dump
 Then continue to execute the code, you will see there are 3 nested loop. Please pay attention to the dump. When I finish the loop, the dump memory is different(Fig.2).

 These loops are aim to moving the
 shellcodeto memory section, just as the same what we talked about before. - While you are continuing to execute forward, you can see the dump memory has changed at
0x00404E38. * Note that you can dump these memory to a new file by right click and select
 Follow in Memory Map, and then right click again then choose `Dump memory to File` * Note that the file you dump is actually ashellcode. How to know?
- Set the break point at
- Finding second injected
shellcode(VirtualAlloc)- Find the expression by pressing
Ctrl+Gand typeVirtualAlloc. Set the break point at the first line and do the same thing above. Pressing
 Execute till returnand check the memory by right clickEAXand chooseFollow in Dump. Finally, press
 step intoto return - Like the same outcome above. While you are continuing to execute, you’ll notice that memory have changed when you step over
0x02B95269. * Note that this is 2nd
 shellcodethat can check in disassembler.
- And obviously,
0x02B9527Dis the 2nd tail jump that will jump to blueshellcodeblock from yellowshellcodeblock.
- You can see that the jumping address is quite different with current address(the following image is not my actually circumstances)

- Find the expression by pressing
- Payload decryption (
VirtualAlloc)- In this section, it’ll use
VirtualAllocagain. So, we just pressRunbutton to get in there. And follow the instruction above.
- Go back → Follow
EAXaddress in dump → Step into → You’ll see 3 nested loop again → Set break point → Run → The memory changed in dump again(this is our payload in memory)
- Dump these code in a new file like above.

- In this section, it’ll use
- Code substitution (
VirtualProtect)- In this section, it’ll use
VirtualProtectAPI, so that we just follow the instruction above. - Find
VirtualProtectbyCtrl+G→ Set break point and pressRunbutton
Interesting things Check out the page talking about
VirtualProtect.Changes the protection on a region of committed pages in the virtual address space of the calling process. To change the access protection of any process, use the VirtualProtectEx function.
And you can especiallly take a look at
[in] flNewProtect The memory protection option. This parameter can be one of the memory protection constants.
Follow the page, you can notice that 0x40 is **`PAGE_EXECUTE_READWRITE`**
You can see the whole parameters about
VirtualProtectinstdcall. They want to modify the original section(replace)
* Continue the instruction mentioned above: go back → step into
They want to modify the original section(replace)
* Continue the instruction mentioned above: go back → step into - In this section, it’ll use
- Finding the “Tail jump”
- Scrolling~~ down and find a looooog jump at
0x001C091Eand step into.
- Scrolling~~ down and find a looooog jump at
- Finding the
OEP0x00404161is yourOEP
Homework
-
Analyze the malware found in the file
workshop_samples.zip->upx_REvil.exe, generate ‘yourself’writeups(with screenshots) and answer the follow questions: 1.1 Where is the memory address of the tail jump? Ans: When you see the machine instructionpopad, the tail jump address is `0x00283F8C` 1.2 Where is the
 OEPof the packed sample? Ans: TheOEPaddress is `0x00264161` -
Analyze the malware found in the file
workshop_samples.zip->custom_packer_REvil.exe, generate ‘yourself’writeups(with screenshots) and answer the follow questions: 2.1 Where is the memory address of the tail jump? Ans: Scrolling~~ down and find a looooog jump at0x001C091Eand step into.
2.2 Where is the OEPof the packed sample? Ans:
is your OEP